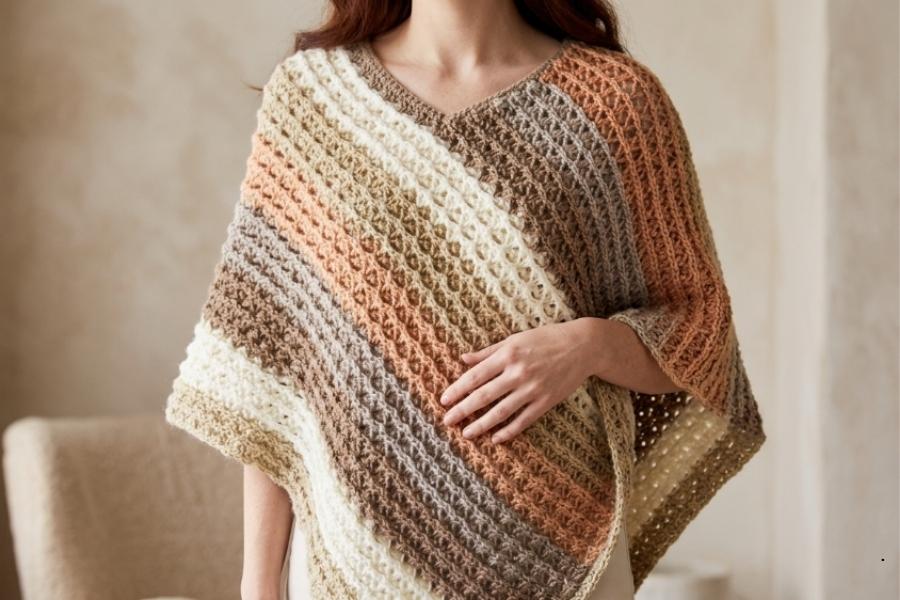
Cozy Crochet Poncho Free Pattern
Video Tutorial Included
Looking for a stylish, cozy, and beautiful layer to add to your wardrobe? This gorgeous crochet poncho features an elegant ribbed texture and a unique lacing effect, making it the perfect weekend project.
Using a simple combination of basic stitches, you can create a stunning drape that fits beautifully.
Materials Needed
- Yarn: Cotton cake yarn (such as color buttercream). For a women’s size small/medium, you will need a little more than 2 skeins.
- Crochet Hook: 5.5 mm
- Notions: Tapestry needle for weaving in ends, scissors.
Pattern Notes and Sizing
- This pattern is written for a women’s size small/medium.
- Foundation Chain Gauge: The initial chain must be a multiple of $4 + 2$. For the full size, you will chain 142. (The tutorial text below uses a 42-chain sample to demonstrate the steps).
- The beginning chain 3 always counts as your first double crochet throughout the pattern.
Step-by-Step Front Panel Instructions
Row 1
- Chain 142.
- Work 1 single crochet into the second chain from your hook.
- Chain 3, skip 3 chains, and work 1 single crochet into the next chain.
- Chain 3, skip 3 chains, and work 1 single crochet into the next chain. Repeat this sequence all the way across your foundation chain. Be careful not to accidentally count the chain you just worked into.
- When you have 4 chains left at the end of the row, chain 3, skip 3 chains, and work 1 single crochet into the very last chain. Turn.
Row 2
- Chain 3 and turn (counts as your first double crochet).
- Work 1 double crochet into the very first stitch (the same stitch where your chain 3 emerged).
- Work 1 more double crochet into that same stitch.
- Skip the next chain-3 loop, and work 3 double crochets directly into the next single crochet stitch.
- Skip the next chain-3 loop, and work 3 double crochets into the next single crochet stitch. Repeat this across the entire row until you have exactly one chain-3 loop left.
- Skip the last chain-3 loop, and work 2 double crochets into the very last single crochet stitch of the row. Turn.
Row 3
- Chain 1 and turn. Work 1 single crochet into the first stitch (the same stitch as your chain 1).
- Chain 3.
- Work a front post single crochet around the middle double crochet of the next 3-double-crochet group. To do this, insert your hook from front to back to front behind the post (the leg) of that middle stitch, pull up a loop, yarn over, and pull through both loops.
- Chain 3, then work a front post single crochet around the middle double crochet of the next group. Repeat this sequence across the row until you have completed working into the final 3-double-crochet group.
- To end the row, chain 3 and work 1 regular single crochet on top of the beginning turning chain at the corner. Turn.
Row 4
- Chain 3 and turn (counts as a double crochet). Work 1 double crochet into the exact same stitch.
- Skip the next chain-3 loop, and work 3 double crochets directly into the next front post single crochet stitch. (You will find these front post single crochets sitting slightly behind your double crochet groups). Repeat this across the row.
- When you reach the end and have just one chain-3 loop and a final single crochet left, skip the loop and work 2 double crochets into that last single crochet stitch. Turn.
Rows 5 and 6 (and beyond)
- Row 5: Repeat Row 3.
- Row 6: Repeat Row 4.
- Continue repeating Rows 3 and 4 sequentially until your front panel measures 16 inches wide when measured from the first row. Do not fasten off.
Step-by-Step Back Panel Extension
The back panel is worked as an L-shaped extension directly from the side of your front panel.
Foundation Row for Back Panel
- Chain 1 and turn. Work 1 single crochet into the first stitch, and 1 single crochet into the next double crochet.
- Work 1 single crochet into each of the next 47 stitches (this gives you a total of 49 single crochets). If done correctly, your 47th single crochet should land on top of a middle double crochet of a cluster group.
- Chain 3, then work 1 front post single crochet in the middle double crochet of the next cluster group.
- Chain 3, 1 front post single crochet in the middle double crochet of the next group. Repeat this to the end of the row.
- End the row by chaining 3 and working 1 single crochet on top of the beginning chain 3. This completes the foundation row for the back panel (you should have 19 chain-3 loops).
Back Panel Row 2
- Chain 3 and turn. Work 1 double crochet in the same first stitch.
- Work 3 double crochets into each front post single crochet across until you have only 1 chain-3 loop left before the section of solid single crochets.
- Skip that last chain-3 loop, and work 2 double crochets into the next single crochet stitch. Leave the remaining single crochet stitches unworked. Turn.
Growing the Back Panel
- Chain 1 and turn. Work 1 single crochet in the first stitch. Chain 3, 1 front post single crochet in the middle double crochet of the next group. Repeat until the last group, then chain 3 and work 1 single crochet on top of the beginning chain 3.
- Chain 3 and turn. Work 1 double crochet in the same stitch. Work 3 double crochets into each front post single crochet across until 1 loop remains. Skip the loop, and work 2 double crochets into the last single crochet.
- Keep repeating these two rows until your back extension measures 28 inches from where the extension started. The length of your back panel should closely match the corresponding edge of the front panel.
Assembly and Shaping
- Lay your work out. The side with the long ribbing lines running down is the front panel; the side with the shorter ribbing lines is the back panel.
- Take the front side, rotate it downward, and bring its edge to meet the edge of the back panel to form the poncho shape.
- Put your hook through the corner of both pieces, grab your yarn loop, and slip stitch the two layers together to join them.
- Tip: Keep your slip stitches loose by pulling your hook up slightly to enlarge the loop before creating each stitch. Align the ribbing as you go.
- Fasten off and turn the poncho right-side out.
Adding the Borders and Edging
Scalloped Side Edge
Because the foundation chain side already has a natural scallop, you will add a matching border to the opposite raw edge.
- Join a light or matching shade of yarn with a slip stitch to the corner of the unbordered side.
- Chain 1, and work 1 single crochet in the same corner.
- Chain 3, and work 1 single crochet on top of the next ribbing section along the spine. Repeat this all the way to the back corner.
- When you reach the end, chain 3, work a final single crochet in the last corner, and fasten off.
Neckline Border
- To make the stitches look neat, work on the inside of the neck opening. Insert your hook into the neck corner from the inside.
- Slip stitch to join a matching yarn color, chain 1, and work single crochets evenly distributed all the way around the neckline until you hit the seam.
- Slip stitch to the first single crochet, fasten off, and weave in all loose yarn tails.
Crochet Poncho Styling Advice and Yarn Tips
Selecting the Right Fiber
While cotton cake yarns offer incredible stitch definition and a breezy, lightweight drape perfect for spring, acrylic or wool-blend yarns can easily transform this pattern into a warm winter staple. If you substitute fibers, look for a category 3 (light) or category 4 (worsted) yarn that recommends a similar hook size to maintain the open, lacy texture of the front post stitches.
Managing Color Changes
If you are using a self-striping or gradient cake yarn, the front panel and back extension will naturally display shifting blocks of color. Do not worry if the colors change mid-row; this adds to the unique, bohemian charm of a handmade poncho. For the neck and side borders, try to source a solid color that matches one of the lighter shades within your cake to create a clean, cohesive frame.
Achieving the Perfect Drape
Post stitches have a tendency to pull inward, which creates the beautiful raised ribbing effect in this pattern. To ensure your poncho remains flowing and flexible rather than stiff, maintain a relaxed tension while working the double crochet rows. If you find your fabric feels too dense, consider switching to a 6.0 mm hook for the double crochet sections.
Video Tutorial
The below video contains all the steps you need to complete this crochet poncho project successfully from start to finish.