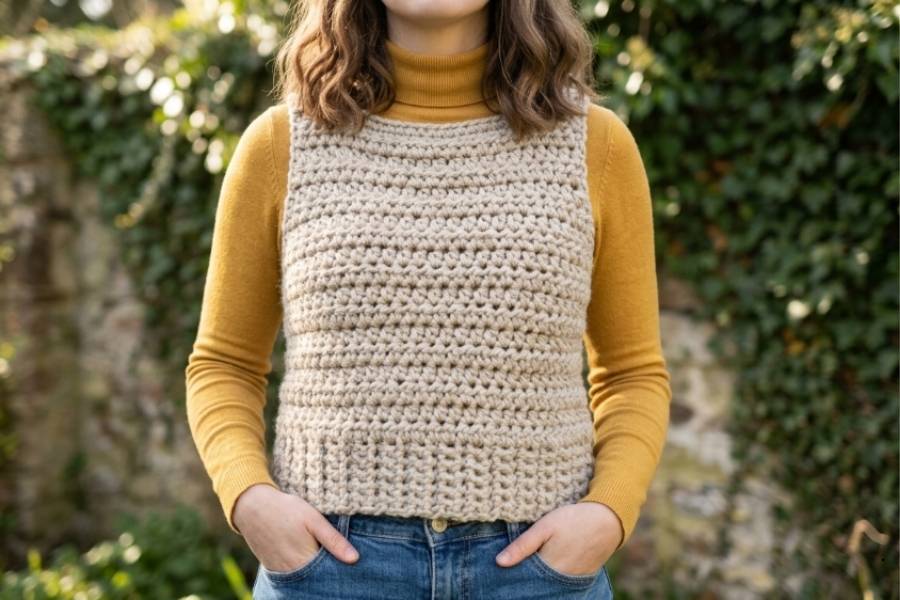
Trendy Crochet Vest Pattern Free for Layering
Video Tutorial Included
This easy, beginner-friendly crochet project guides you through crafting a comfortable sweater vest perfect for layering during the spring and fall seasons.
Worked in two separate pieces using simple stitches, this design is easily customizable and can be scaled to fit women’s sizes ranging from extra-small up to double-extra-large.
Materials Needed
Before beginning your project, gather the following essential supplies:
- Yarn: Number 6 super bulky yarn (the example features a blend of 80% acrylic and 20% alpaca, providing 130 yards / 119 meters per 100g ball). You will need approximately two balls.
- Crochet Hook: 8 mm hook.
- Scissors
- Stitch Markers: Two markers are required.
- Yarn Needle
Pattern Description and Measurements
This sweater vest is constructed by making two separate pieces: a front panel and a back panel.
- Back Panel: You will start by crocheting the bottom ribbing vertically, then rotate the piece to work the body stitches across the long edge of the ribbing.
- Front Panel: This piece is crocheted identically to the back panel until the last five rows, where you will split the stitches to shape the left and right shoulders.
Once both panels are complete, you will sew them together at the shoulder and side seams, finishing with a tidy border around the neckline. For a size small, the completed garment measures 17 inches across the width and 16.5 inches in total length.
Back Panel Ribbing
- Create a slip knot and work 7 initial chains.
- Row 1: Insert your hook into the back bump of the second chain from the hook and make a single crochet. Work 1 single crochet into the back bump of each remaining chain across. You will have 6 single crochet stitches.
- Row 2: Chain 1 and turn. The chain-1 structure does not count as a stitch. Work 1 single crochet into both loops of each stitch across. You will maintain a count of 6 stitches.
- Rows 3–34: Repeat Row 2 continuously until you complete 34 total rows of single crochet ribbing.
Back Panel Body
- Row 1 (Wrong Side): Turn your finished ribbing sideways so you are looking at the long edge. Chain 1. Work 1 half double crochet (hdc) into the edge space of each row across the ribbing. You should finish this row with exactly 34 half double crochet stitches.
- Row 2: Chain 1 and turn. Work 1 half double crochet into every stitch across the row. (34 stitches).
- Rows 3–8: Repeat Row 2. Do not add any increases or decreases.
Armhole Shaping and Decreases
To shape the armholes, you will decrease the stitch count over the next few rows:
- Row 9: Chain 1 and turn. Work a half double crochet two together (hdc2tog) across the first two stitches to decrease by one stitch. Work 1 half double crochet into each subsequent stitch across until only two stitches remain. Work an hdc2tog across the final two stitches. You will have 32 stitches.
- Rows 10–14: Repeat the decrease sequence outlined in Row 9 for each row, reducing your total count by two stitches per row (one stitch on each side). At the end of Row 14, you will have 22 stitches remaining.
- Row 15: Chain 1 and turn. Work 1 half double crochet into each stitch across. No more decreases. (22 stitches).
- Rows 16–22: Repeat Row 15 to build the remaining height of the back panel. Fasten off and leave a short tail to weave in later.
Front Panel and Shoulder Shaping
To make the front panel, repeat the exact steps from the back panel ribbing all the way through Row 17 of the body. You will have 22 stitches across. From here, you will shape the shoulders separately:
Left Shoulder
- Row 18: Chain 1 and turn. Work 1 half double crochet into each of the first 4 stitches. Drop the remaining stitches of the row to focus entirely on this shoulder side. (4 stitches).
- Rows 19–22: Chain 1, turn, and work 1 half double crochet into each of the 4 stitches. Fasten off, leaving an 6-inch yarn tail for seaming.
Right Shoulder
- Row 18: Return to Row 17. Skip 14 stitches from the left shoulder to create the neckline opening. Join your new yarn in the 15th stitch. Chain 1, work 1 half double crochet into that same stitch, and work 1 half double crochet into each of the remaining 3 stitches across the edge. (4 stitches).
- Rows 19–22: Chain 1, turn, and work 1 half double crochet into each of the 4 stitches. Fasten off, leaving a 6-inch yarn tail for seaming.
Assembly and Seaming
- Shoulder Seams: Lay your front and back panels together with the wrong sides facing up (right sides facing down). Thread your yarn needle with the long shoulder tails. Align the 4 shoulder stitches of the front panel to the 4 corresponding edge stitches of the back panel. Sew back and forth through both loops to secure, lock the yarn, and weave in the end. Repeat for the other shoulder.
- Side Seams: Align the sides of the vest. Cut a new strand of yarn roughly 18 to 20 inches long. Starting from the bottom ribbing edge, sew the front and back panels together up the sides. Stop sewing when you reach the end of body Row 8 (right before the armhole decreases start). Fasten off and secure your yarn. Repeat on the opposite side.
Neckline Border
- Turn your assembled vest right-side out. Join your yarn directly at either shoulder seam.
- Round 1: Chain 1. Work 1 single crochet into the same space as the join. Place a stitch marker in this first stitch. Work single crochets evenly around the raw edges of the neck opening, placing stitches into the stitch loops along the front/back and into the row ends along the sloped shoulder sides. You should have roughly 40 stitches around.
- Round 2: Remove the marker. Work 1 single crochet into each stitch around the neckline.
- Fasten off using an invisible join or slip stitch, thread your needle, and neatly weave all remaining yarn tails into the inside structure of the vest.
Understanding Super Bulky Yarn Gauge
When working with a thick number 6 weight yarn, minor changes in your personal tension can significantly alter the size of the final garment. Because super bulky yarn creates massive stitches, missing the gauge check can easily make your vest a few inches too large or too small. Always create a small test swatch before jumping into the main panel ribbing.
The Importance of Blocking Separate Panels
Because this pattern requires sewing two flat panels together, blocking your front and back pieces prior to assembly makes a massive difference in the professional look of your final vest. Pinning the unjoined panels out to your target measurements and steaming them relaxes the bulky fibers, flattens curling edges, and ensures your side seams align flawlessly.
Hiding Yarn Tails in Thick Stitches
Weaving in ends on super bulky projects requires a bit of care because thick yarn tails can create unsightly lumps inside your garment if bunched together. To keep your seams completely smooth, split the yarn plies down with your tapestry needle when weaving into the ribbing or slide the tails horizontally directly through the densest part of the half double crochet stitches.
The below video contains all the steps you need to successfully complete this crochet sweater vest.