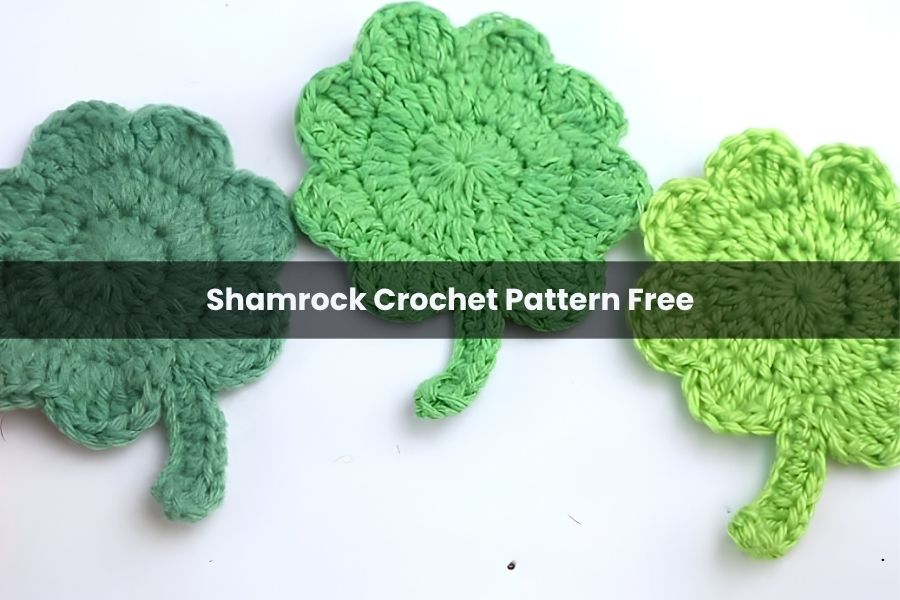
Shamrock Crochet Pattern Free
Whether you are preparing for St. Patrick’s Day or simply want to spread a little good luck, these crochet clovers are the perfect quick project. These versatile appliques can be sewn onto hats, scarves, and blankets, or you can even glue a safety pin to the back to wear them on your shirt.
This guide provides instructions for both the traditional three-leaf shamrock and the “lucky” four-leaf clover.
Materials Needed
- Yarn: Medium weight (Number 4) yarn. Acrylic works best for appliques. A vibrant “Spring Green” is recommended.
- Hook: 5.5 mm (Size I) crochet hook.
- Tools: Tapestry needle for weaving in ends and scissors.
- Size: The four-leaf clover measures approximately 2.5 to 3 inches across (not including the stem).
The Four-Leaf Clover Pattern
Round 1: Foundation and Stem
- Ring: Start with a slip knot. Chain 4 and slip stitch into the first chain to form a ring.
- Petal Bases: Chain 5, slip stitch into the ring. Repeat this 4 times in total. You will have four loops of chain-5.
- The Stem: From your current position, chain 8.
- Half Double Crochet (HDC) in the 3rd chain from the hook.
- HDC in the next chain.
- Single Crochet (SC) in the remaining 4 chains.
- Finish Round: Slip stitch back into the center ring.
Round 2: Creating the Leaves
Every leaf is worked into the chain-5 spaces created in Round 1.
- Leaf Setup: Slip stitch into the first chain-5 space. Chain 1.
- First Half of Leaf: Work 1 SC, 2 HDC, and 3 Double Crochet (DC) into the space.
- The Center Indent: Work 2 HDC into the same space (this creates the heart-shaped dip in the leaf).
- Second Half of Leaf: Work 3 DC, 2 HDC, and 1 SC into the same space.
- Finish Leaf: Slip stitch back into the center ring.
- Repeat: Repeat these steps for the remaining three chain-5 loops.
The Three-Leaf Shamrock Pattern
Round 1: Foundation and Stem
- Ring: Chain 3 and slip stitch into the first chain to form a ring.
- Petal Bases: Chain 4, slip stitch into the ring. Repeat this 3 times in total.
- The Stem: Chain 8.
- HDC in the 3rd chain from the hook.
- HDC in the next chain.
- SC in the remaining 4 chains.
- Finish Round: Slip stitch back into the center ring.
Round 2: Creating the Leaves
The leaves for the three-leaf version are slightly smaller to maintain proportion.
- Leaf Setup: Slip stitch into the first chain-4 space. Chain 1.
- First Half of Leaf: Work 1 SC, 1 HDC, and 2 DC into the space.
- The Center Indent: Work 2 HDC.
- Second Half of Leaf: Work 2 DC, 1 HDC, and 1 SC.
- Finish Leaf: Slip stitch into the same space to secure.
- Repeat: Repeat these steps for the remaining two chain-4 loops.
Finishing and Assembly
Closing the Center
Flip the clover to the back. Take the starting tail from your magic ring or foundation chain and thread it through a tapestry needle. Sew in a circle around the center opening and pull tight to close the gap. Secure with a knot.
Weaving Ends
Take the final yarn tail and weave it through the back of the stitches, following the curve of the leaves to ensure it remains invisible from the front.
Professional Tips
- Stiffening: If your clover is a bit floppy, you can spray it with a light coat of fabric stiffener or hairspray to help it hold its shape.
- Safety Pins: To turn these into pins, simply sew a small safety pin to the back of the center ring.
- Gift Idea: Handing out four-leaf clovers at a community center or grocery store is a wonderful way to brighten someone’s day “just because.”
Note: If you are using a lighter weight yarn (like a Size 3), the clover will be smaller and more delicate, making it perfect for baby clothes or hair accessories.