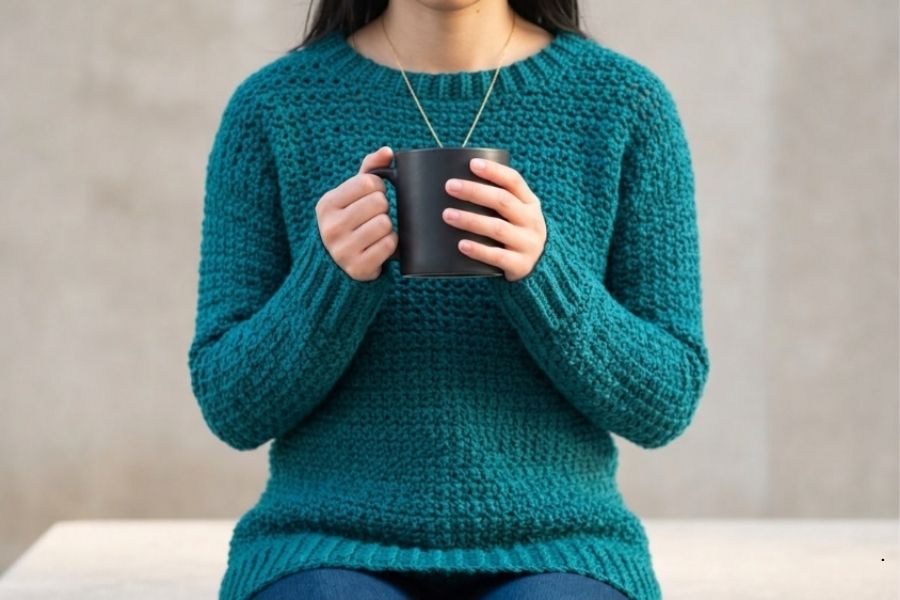
Crochet Sweater Pattern Free
Video Tutorial Included
This free crochet sweater pattern guides you through creating a cozy, stylish pullover. Featuring a classic ribbed texture and a comfortable fit, this garment is worked in individual panels before assembly. It is an excellent project for crafters looking to expand their skills into handmade garments.
Materials Needed
- Yarn: DK weight yarn (merino silk blend recommended)
- Crochet Hook: 6 mm hook
- Tools: Scissors, darning needle, and stitch markers
Back Panel Ribbing
The foundation of the back panel begins with the bottom ribbed edging, worked horizontally.
- Create a slip knot and chain 9.
- Single crochet (sc) into the second chain from the hook and in each remaining chain across. (8 stitches total). Turn your work.
- Row 2: Chain 1 (does not count as a stitch here or throughout the ribbing). Back loop single crochet (blsc) into the first stitch and each subsequent stitch until 1 stitch remains. Single crochet normally into the final stitch. Turn your work.
- Repeat Row 2 until you complete a total of 73 rows. Do not fasten off.
Back Panel Body
The main body is worked directly onto the long raw edge of the ribbing you just completed.
- Rotate your work to stitch along the long edge of the ribbing, treating each row end as one stitch.
- Row 1: Chain 1. Single crochet into the first row end. Chain 1, skip 1 row end, single crochet into the next row end. Repeat from * to * across the entire edge. (73 stitches total). Turn your work.
- Row 2: Chain 1 (this chain-1 now counts as a stitch). Single crochet into the first stitch. Chain 1, skip 1 stitch, single crochet into the next stitch. Repeat from * to * until the end of the row. (73 stitches total). Turn your work.
- Repeat Row 2 until you reach the end of Row 80. Fasten off.
Front Panel Foundation
The front panel begins exactly like the back panel, creating a matching silhouette before shaping the neckline.
- Follow the exact instructions for the Back Panel Ribbing and Body until you complete Row 70.
- At the end of Row 70, do not fasten off.
- Counting back from your crochet hook, place a stitch marker into the 30th stitch (ensure it is placed in a chain space).
Front Panel Shoulder Shaping: Side One
Decreases are introduced on this side to gently slope the neckline.
- Row 1: Chain 1. Single crochet into the first stitch, chain 1, skip 1 stitch. Repeat from * to * until you are 2 stitches away from your stitch marker. Single crochet the last 2 stitches together (sc2tog). (28 stitches total). Turn your work.
- Row 2: Chain 1. Single crochet two together over the first 2 stitches. Chain 1, skip 1 stitch, single crochet into the next stitch. Repeat from * to * until the end of the row. (27 stitches total). Turn your work.
- Row 3: Chain 1. Single crochet into the first stitch. Chain 1, skip 1 stitch, single crochet into the next stitch. Repeat from * to * until 2 stitches remain in the row. Single crochet two together. (26 stitches total). Turn your work.
- Row 4: Repeat Row 2. (25 stitches total).
- Repeat the established pattern of Rows 3 and 4 until you finish Row 8. Your stitch count will decrease by one after every row, leaving you with 21 stitches at the end of Row 8.
- Row 9: Chain 1. Single crochet into the first stitch. Chain 1, skip 1 stitch, single crochet into the next stitch. Repeat from * to * across the row without decreasing. (21 stitches). Turn your work.
- Row 10: Repeat Row 9. Fasten off and turn your work.
Front Panel Shoulder Shaping: Side Two
Mirroring the first side finishes the front collar configuration.
- Locate your central stitch marker. Skip 14 stitches past the marker and insert your hook into the next single crochet stitch. Pull up a loop of yarn and chain 1.
- Row 1: Single crochet two together (place a stitch marker here to track your row start). Single crochet into the next stitch. Chain 1, skip 1 stitch, single crochet into the next stitch. Repeat from * to * until the end of the row. (28 stitches total). Turn your work.
- Row 2: Chain 1. Single crochet into the first stitch, chain 1, skip 1 stitch. Repeat from * to * until 2 stitches remain (the last stitch contains your marker). Single crochet two together. (27 stitches total). Turn your work.
- Row 3: Chain 1. Single crochet two together (use a marker if needed to track the stitch). Single crochet into the next stitch. Chain 1, skip 1 stitch, single crochet into the next stitch. Repeat from * to * until the end of the row. (26 stitches total). Turn your work.
- Row 4: Repeat Row 2. (25 stitches total).
- Repeat the pattern of Rows 3 and 4 until you finish Row 8. (21 stitches total).
- Row 9: Chain 1. Single crochet into the first stitch. Chain 1, skip 1 stitch, single crochet into the next stitch. Repeat from * to * across the row. Turn your work.
- Row 10: Repeat Row 9. Fasten off to finish the front panel.
Sleeve Panels
The sleeves feature built-in cuff ribbing and subsequent row increases for a tapered fit. Two matching sleeves must be made.
- Chain 11. Single crochet into the second chain from the hook and each chain across. (10 stitches). Turn your work.
- Row 2: Chain 1. Back loop single crochet into each stitch until 1 remains. Single crochet normally into the final stitch. Turn your work.
- Repeat Row 2 until you reach the end of Row 31. Turn your work to crochet along the long edge.
- Sleeve Row 1: Chain 1. Single crochet into the first row end. Chain 1, skip 1 row end, single crochet into the next row end. Repeat from * to * across. (31 stitches total). Turn your work.
- Rows 2–4: Chain 1. Single crochet into the first stitch. Chain 1, skip 1 stitch, single crochet into the next stitch. Repeat from * to * across. Turn your work.
- Row 5 (Increase Row): Chain 1. Place 2 single crochets into the very first stitch. Chain 1, skip 1 stitch, single crochet into the next stitch. Repeat from * to * until 1 stitch remains. Place 2 single crochets into the final stitch. (33 stitches total). Turn your work.
- Row 6: Chain 1. Single crochet into the first stitch, and single crochet into the next stitch. Chain 1, skip 1 stitch, single crochet into the next stitch. Repeat from * to * until 1 stitch remains. Single crochet into the final stitch. (33 stitches total). Turn your work.
- Rows 7–8: Repeat Row 6.
- Row 9 (Increase Row): Chain 1. Single crochet into the first stitch, chain 1. Without skipping a stitch, single crochet into the next stitch. Chain 1, skip 1 stitch, single crochet into the next stitch. Repeat from * to * until 1 stitch remains. Chain 1, single crochet into the final stitch. (35 stitches total). Turn your work.
- Repeat the sequence of Rows 1 through 9 until you reach Row 54, accumulating a final count of 55 stitches. Fasten off.
- Fold the sleeve panel in half lengthwise and use a whip stitch to seam the edges together. Repeat for the second sleeve.
Neckline Ribbing
The collar ribbing is worked as a separate band before being attached to the garment.
- Chain 6. Single crochet into the second chain from the hook and each chain across. (5 stitches total). Turn your work.
- Row 2: Chain 1. Back loop single crochet into each stitch until 1 remains. Single crochet normally into the final stitch. Turn your work.
- Repeat Row 2 until the ribbed band measures approximately 46 centimeters (18 inches) long, which takes about 66 rows. Fasten off.
Garment Assembly
Bringing the separate elements together completes the pullover structure.
- Lay the front panel directly on top of the back panel, aligning the outer edges.
- Using a darning needle, sew the shoulder seams securely together.
- Sew up the sides of the body from the bottom to the top, leaving an opening at the top appropriate for your armholes. To create a split-hem look, begin sewing from the top of the bottom ribbing rather than the very bottom edge.
- Attach the seamed sleeves to the open armholes using a darning needle.
- Align the center fold of your neckline ribbing with the center front of the sweater neckline. Use stitch markers to hold it evenly in place around the collar opening, whip stitch the edges together, and sew the short ends of the ribbing together where they meet.
- Weave in all remaining loose yarn ends securely, then steam and block your completed sweater to settle the stitches.
Choosing and Substituting Yarn Weights
When selecting yarn for a wearable garment, matching the recommended weight is essential for achieving the intended fit. While this specific pattern utilizes a DK weight merino silk blend, substituting with a different fiber profile can alter the drape significantly. Pure wool or acrylic alternatives will produce a structured, warm garment, whereas bamboo or cotton blends of the same weight will result in a sweater with more fluid movement and breathability.
Yarn Tension and Swatching Advice
Failing to check stitch tension before embarking on a full garment can lead to sizing issues. Creating a small square swatch using the moss stitch pattern described in the body sections helps confirm if your hook size aligns with the intended dimensions. If your stitches turn out tighter than expected, shifting to a slightly larger hook will correct the fabric stiffness; if your stitches are too loose, dropping down a hook size will stabilize the structure.
Garment Care and Blocking Practices
Proper maintenance preserves the longevity of handmade crochet garments. Utilizing a steam or wet blocking method after assembly relaxes the fibers, aligns uneven edges, and brings out the true drape of the stitch pattern. For future care, washing the sweater gently by hand in cold water and drying it flat avoids stretching out the shoulders or distortion from a machine spin cycle.
The below video contains all the steps you need.
Video Tutorial
For a complete visual walkthrough of the pattern, stitch placements, and assembly techniques required to complete this sweater, you can follow the detailed video guide here: