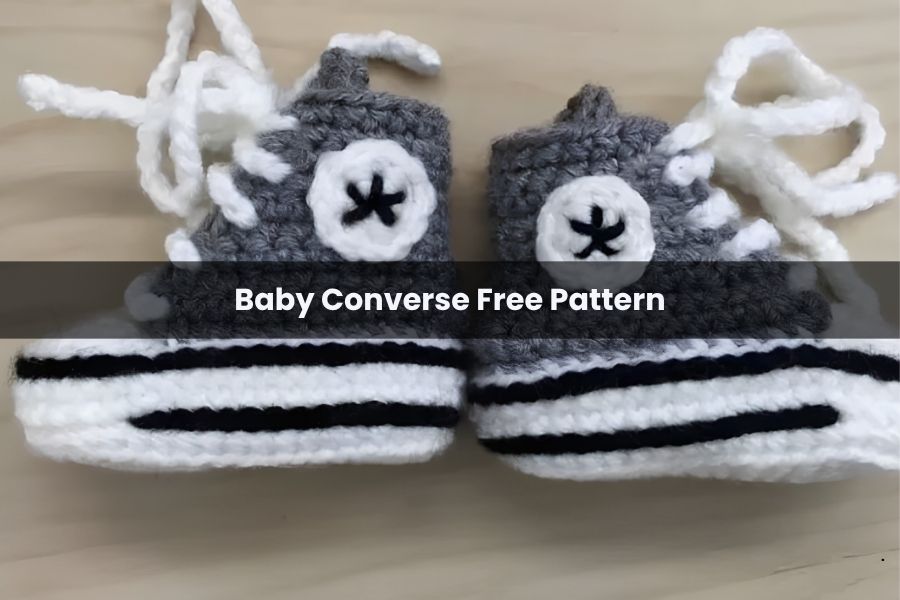
Baby Converse Free Pattern
Capture the classic “cool” of high-top sneakers with this detailed crochet guide. This pattern creates a soft, stylish baby bootie measuring approximately 4 inches (10 cm), perfect for newborns and infants up to 6 months.
Materials Needed
- Yarn: Medium weight (Category 4) cotton or acrylic yarn in White, Black, and a primary color (e.g., Blue, Red, or Gray).
- Hook: 4.5 mm crochet hook.
- Tools: Darning needle, scissors, and stitch markers.
Part 1: The Sole
The sole is worked in rounds starting from a center chain.
Round 1
- Chain 11.
- 2 Single Crochet (SC) in the 2nd chain from hook.
- SC in next 4 chains.
- 2 Half Double Crochet (HDC) in next 2 chains.
- 2 Double Crochet (DC) in next 2 chains.
- In the last chain, work 7 DC (this creates the toe curve).
- Working down the opposite side of the chain: 2 DC, 2 HDC, 4 SC.
- 2 SC in the very last space. Join with a slip stitch (sl st) to the first SC. (27 sts)
Round 2
- Chain 1. 2 SC in the first stitch, 2 SC in the next.
- SC in next 9 stitches.
- Toe Increase: 2 SC in each of the next 5 stitches (10 sts total).
- SC in next 9 stitches.
- 2 SC in each of the last 2 stitches. Join. (36 sts)
Round 3
- Chain 1. [1 SC, 2 SC in next] repeat twice.
- SC in next 9 stitches.
- Toe Increase: [1 SC, 2 SC in next] repeat 5 times.
- SC in next 9 stitches.
- [2 SC in next, 1 SC] repeat twice. Join. (45 sts)
Part 2: The Shoe Walls
Round 4: Chain 1. SC in the Back Loop Only (BLO) of every stitch around. Join. (45 sts) Rounds 5–6: Chain 1. SC in both loops of every stitch around.
Important Finishing Step: After Round 6, do not slip stitch. Cut the yarn and use a darning needle to create an invisible join. This creates a 46th “mock” stitch for a seamless look.
Part 3: Sole Detailing
- Mark the center toe. Count 7 stitches to the left and 7 to the right; mark these side points.
- Black Detail Line: Insert hook above the Row 4 BLO ridge. Use black yarn to surface slip stitch from one side marker, around the heel, to the other side marker.
- Bring the yarn to the top row and repeat the surface slip stitch around the upper edge of the white sole.
Part 4: The Sides (Main Color)
Leave an 80-inch tail before starting for the final edging.
- Row 1: Join yarn in the BLO to the left of the toe marker. SC in the BLO for 31 stitches. (Leave the toe area open).
- Row 2 (Decreasing): Chain 1, turn. 11 SC, [DEC (2 SC together)] twice, 1 SC, [DEC] twice, 11 SC. (27 sts)
- Row 3: Chain 1, turn. DEC, 23 SC, DEC. (25 sts)
- Row 4: Chain 1, turn. DEC, 6 SC, DEC, 1 SC, DEC, 6 SC, DEC. (19 sts)
- Row 5: Chain 1, turn. DEC, 15 SC, DEC. (17 sts)
- Row 6: Chain 1, turn. 17 SC across.
- Row 7: Chain 1, turn. DEC, 13 SC, DEC. (15 sts)
- Rows 8–9: SC across. Fasten off.
The Edging: Use the long tail left at the start to SC up the side of the rows, across the top, and down the other side to create a clean finish.
Part 5: The Tongue & Toe Cap
- Toe Cap (White): Chain 2. Work 5 SC in the 1st chain. Turn.
- Work 2 SC in each stitch (10 sts). Turn.
- [1 SC, 2 SC in next] repeat 5 times (15 sts).
- The Tongue: Work 6 SC across the straight edge of the cap.
- Change to your primary color. Work 10 rows of 6 SC.
- Final Row: DEC, 2 SC, DEC. Fasten off.
Assembly: Center the toe cap over the open area of the sole. Use a darning needle to sew the cap to the sole, catching only the top loops for a professional look.
Part 6: The Logo & Laces
The Star Patch
- Chain 2. Work 5 HDC in the 1st chain. Join.
- Chain 1. Work 2 SC in each stitch (10 sts). Join and fasten off.
- Use black thread to embroider a 5-point star over the white circle. Sew the patch to the outer side of the bootie.
The Laces
- Chain approximately 150 (or 30 inches long).
- Thread the chain through the natural gaps in the side rows of the bootie, criss-crossing just like real sneakers.
Repeat all steps for the second shoe!