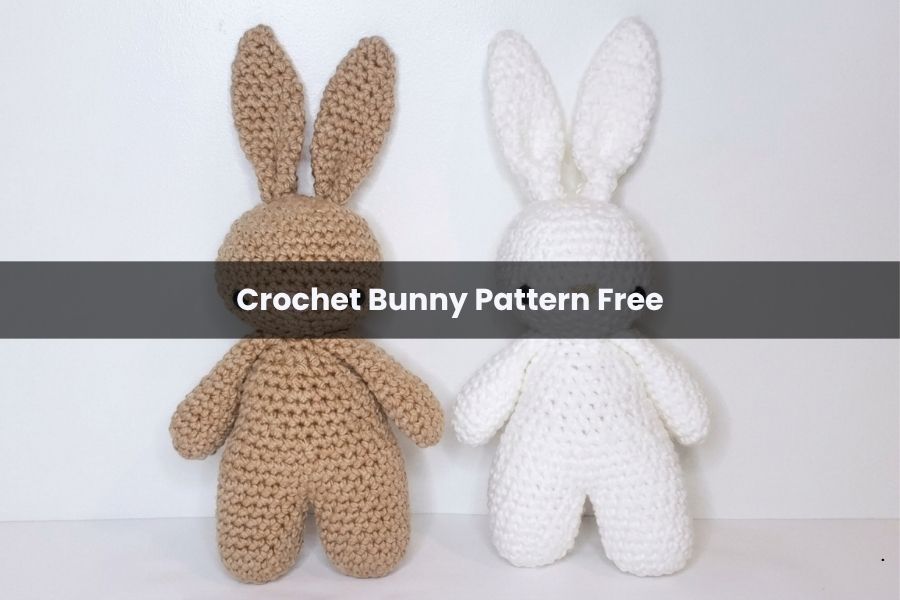
Crochet Bunny Pattern Free
There is something truly magical about transforming a simple skein of yarn into a soulful little friend. Whether you are prepping for Easter, decorating a nursery, or looking for that perfect handmade baby shower gift, these bunnies are a joy to create. Let’s pick up our hooks and bring one to life!
Materials & Basics
To begin, grab your favorite worsted weight yarn, a matching crochet hook, safety eyes, a tapestry needle, and some polyfill stuffing. We will be working in continuous rounds.
Abbreviations:
- SC: Single Crochet
- INC: Increase (2 SC in one stitch)
- DEC: Decrease (SC 2 stitches together)
- ST: Stitch
The Legs & Torso
We build this bunny from the ground up, starting with two separate legs that join to form the body.
The Legs (Make 2)
- Rnd 1: 6 SC into a magic circle. (6)
- Rnd 2: INC in each ST around. (12)
- Rnd 3: [INC, 1 SC] 6 times. (18)
- Rnd 4-9: SC in each ST around. (18)
- For the first leg: Fasten off with a short tail. For the second leg: Do not fasten off.
Joining the Body
- Rnd 10: With the second leg still on your hook, SC directly into any stitch of the first leg to join them. SC around the first leg (18) and then SC around the second leg (18). (36)
- Rnd 11-13: SC in each ST around. (36)
- Note: Use your tapestry needle and the yarn tail from the first leg to sew shut the small gap between the legs.
- Rnd 14: [DEC, 4 SC] 6 times. (30)
- Rnd 15: SC around. (30)
- Rnd 16: [DEC, 4 SC] around. (25)
- Rnd 17-19: SC around. (25)
- Rnd 20: [DEC, 3 SC] around. (20)
- Rnd 21: SC around. (20)
- Rnd 22: [DEC, 3 SC] around. (16)
- Rnd 23: [DEC, 2 SC] around. (12)
- Finish: Slip stitch into the next ST, fasten off, and stuff the torso firmly.
The Arms (Make 2)
The arms are kept relatively flat to give the bunny a gentle, floppy feel.
- Rnd 1: 6 SC in magic circle. (6)
- Rnd 2: INC in each ST around. (12)
- Rnd 3-14: SC in each ST around. (12)
- Finish: Slip stitch and fasten off, leaving a long tail for sewing. Add just a tiny bit of stuffing to the bottom of the hand.
The Head
- Rnd 1: 6 SC in magic circle. (6)
- Rnd 2: INC in each ST. (12)
- Rnd 3: [INC, 1 SC] around. (18)
- Rnd 4: [INC, 2 SC] around. (24)
- Rnd 5: [INC, 3 SC] around. (30)
- Rnd 6: [INC, 4 SC] around. (36)
- Rnd 7-12: SC around. (36)
- Rnd 13: [DEC, 4 SC] around. (30)
- Rnd 14: [DEC, 3 SC] around. (24)
- Rnd 15: [DEC, 2 SC] around. (18)
Face Assembly: Before closing the head, place safety eyes between rounds 11 and 12, about 10 stitches apart. Using pink yarn and your tapestry needle, embroider a small triangular nose centered between the eyes.
- Rnd 16: [DEC, 1 SC] around. (12)
- Rnd 17: DEC 6 times. (6)
- Finish: Fasten off with a long tail. Stuff the head firmly before sewing the bottom closed.
The Ears (Make 2)
- Rnd 1: 6 SC in magic circle. (6)
- Rnd 2: SC around. (6)
- Rnd 3: [INC, 1 SC] around. (9)
- Rnd 4-5: SC around. (9)
- Rnd 6: [INC, 2 SC] around. (12)
- Rnd 7-16: SC around. (12)
- Finish: Slip stitch and fasten off. To get that classic bunny look, pinch the base of the ear together and sew a few stitches through the bottom to hold the “folded” shape.
Final Assembly
Now for the best part—bringing your bunny together!
- Arms: Flatten the tops and sew them to the sides of the torso near the neck.
- Head: Center the head over the neck opening of the torso. Use a ladder stitch to secure it, ensuring the face is pointing directly forward.
- Ears: Position the ears on top of the head. Sew them securely, checking frequently to make sure they aren’t leaning or sagging.
Your handmade bunny is ready for a hug! Feel free to experiment with different colors—a patch-work bunny or a classic cream one both look equally adorable. Happy crocheting!