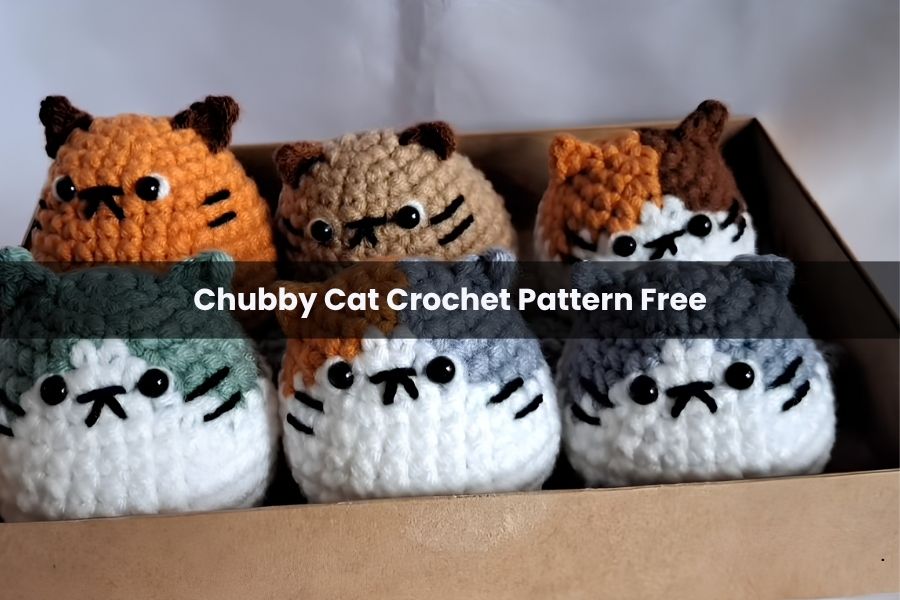
Chubby Cat Crochet Pattern Free
There is something undeniably charming about a “chubby” amigurumi. These little round cats are the perfect afternoon project—they are quick to make, use very little yarn, and make the most adorable gifts or bag charms.
The best part about this pattern is its versatility. While this guide walks you through a bicolor (calico-style) cat using orange, gray, and white, the base pattern is exactly the same for a solid-colored cat. All you have to do is swap the color changes for a single shade!
Materials Needed
- Yarn: Medium weight (Size 4) yarn in Orange, Gray, and White.
- Hook: 2.5mm or 3.0mm (to keep stitches tight).
- Eyes: 5mm plastic safety eyes.
- Stuffing: Polyester fiberfill.
- Extras: Stitch marker, tapestry needle, and a thin black yarn for the face details.
Part 1: The Body
We work from the top down. We will be juggling colors to create the “patches” on the cat’s head.
Round 1: Create a Magic Ring. Work 3 SC in Orange. Switch to Gray (before finishing the 3rd stitch), and work 3 SC in Gray. Switch back to Orange. (6 sts)
Round 2: [Increase (2 SC in one stitch)] in each of the 3 Orange stitches. Switch to Gray; Increase in each of the 3 Gray stitches. Switch to Orange. (12 sts)
Round 3: [1 SC, INC] 3 times in Orange. Switch to Gray; [1 SC, INC] 3 times in Gray. (18 sts)
Round 4: 8 SC in Orange. Join White yarn; 2 SC in White. Switch to Gray; 8 SC in Gray. (18 sts)
Round 5: In Orange: [2 SC, INC] twice, then 2 SC. Switch to White: INC, 2 SC. Switch to Gray: INC, [2 SC, INC] twice, 2 SC, INC. (24 sts)
Round 6: 9 SC in Orange, 6 SC in White, 9 SC in Gray. (24 sts)
Round 7: In Orange: [3 SC, INC] twice. Switch to White: [3 SC, INC] twice. Switch to Gray: [3 SC, INC] twice.
- Note: At the end of R7, switch to White and cut the Orange and Gray tails. Secure them inside.
Placement: Insert 5mm eyes between Rounds 5 and 6, about 3 stitches apart.
Rounds 8–11: SC in every stitch around using White. (30 sts)
Round 12 (The Paws): 14 SC, Bobble Stitch (for the first paw), 3 SC, Bobble Stitch (second paw), 11 SC. (30 sts)
Round 13: SC in every stitch around. (30 sts)
Part 2: Closing the Bottom
Round 14: [3 SC, INV DEC] around. (24 sts)
Round 15: [2 SC, INV DEC] around. (18 sts)
Round 16: [1 SC, INV DEC] around. (12 sts) Stuff the body firmly here.
Round 17: INV DEC around. (6 sts) Fasten off and weave the tail through the front loops to cinch the hole closed.
Part 3: The Ears & Tail
The Ears (Make 2)
We crochet these directly onto the head for a seamless look.
- Make a slip knot and join it to a stitch between Rounds 4 and 5.
- Chain 3. Skip the first chain, Slip Stitch in the 2nd chain, and SC in the 3rd chain.
- Slip Stitch back into the head (between Rounds 2 and 3) to anchor the ear. Fasten off and weave in ends.
The Tail
- Round 1: Magic Ring with 6 SC.
- Rounds 2–8: SC in each stitch around. (6 sts)
- Optional: Switch colors halfway through for a striped tail!
- Fasten off, leaving a long tail. Sew to the back of the cat between Rounds 13 and 14.
Part 4: Finishing Touches
The “soul” of the cat is in its face. Use your thinner black yarn or embroidery floss to:
- Stitch a small “V” or “Y” shape right between the eyes for the nose and mouth.
- Add two small horizontal lines on each side for whiskers.
- Pro Tip: Use a tiny bit of white yarn to stitch a small vertical line on the outer edge of each safety eye; it gives the cat a “sparkle” in its look!
Your chubby cat is now ready to be attached to a keychain and taken on an adventure. Happy hooking!