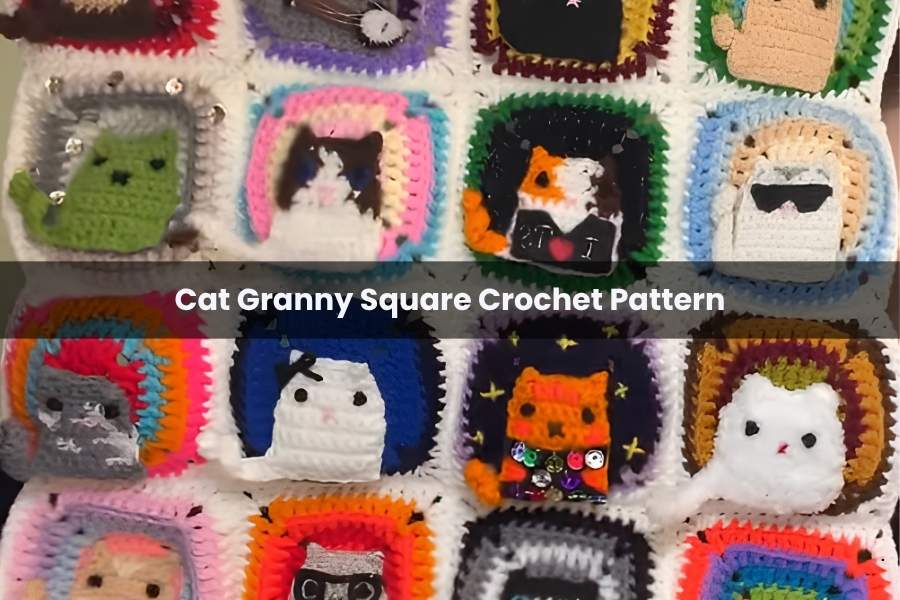
Cat Granny Square Crochet Pattern
Whether you’re crafting a cozy gift or looking for a way to carry your daily essentials, this Cat Granny Square Crochet Pattern offers the perfect blend of vintage charm and feline personality. This guide will walk you through creating a textured, dimensional square that features an adorable stitched-on cat.
Getting Started
Before we pick up the hook, let’s talk about materials. While you can use any yarn, a 100% acrylic weight 2 yarn paired with a 2.5 mm (Size C) hook creates a crisp, lightweight square. I don’t recommend going over a 4 mm hook, or the square may feel too bulky.
Materials Needed:
- Yarn: At least four colors for the center and one for the border.
- Hooks: A main 2.5 mm hook and a smaller hook for tight stitches.
- Tools: Scissors, darning needle, and blocking board (optional).
- Accessories: Felt, sequins, or floral wire if you wish to customize your cat.
Part 1: The Granny Square
This square consists of six rounds. To ensure the cat stands out, I recommend using the same color for the first two rows, as the cat’s body often covers the center.
The Core (Rounds 1-3)
- Magic Circle: Create a magic circle and chain 5 (counts as dc + ch-2).
- Round 1: Work three clusters of 3 dc, each separated by ch-2. For the final cluster, work 2 dc and slip stitch into the 3rd chain of your starting ch-5. (24 stitches).
- Round 2: Chain 5. Work dc into the ch-2 space, then dc into each stitch across. In corners, work [dc, ch-2, dc]. Each side should have 5 dc.
- Round 3: Follow the same logic; each side will now have 7 dc.
Adding Dimension (Rounds 4-6)
- Round 4: Each side grows to 9 dc.
- Round 5 (Back Loop Only): To give the square definition, work dc into the back loops only. Each side should have 11 dc.
- Round 6 (The Border): Switch to your border color (like white). Use half double crochet (hdc) for a slightly larger square. In corners, work [2 hdc, ch-2, 2 hdc].
Pro-Tip: If your square looks deformed or curved, don’t panic! A quick blocking session (spraying with water and pinning it flat for 10 minutes) will make it perfectly square.
Part 2: The Cat Body
The cat is crocheted separately and then sewn onto the square.
- Tail & Base: Chain 23. Starting in the 2nd chain from hook, sc all the way down (22 sc). The curl is the tail!
- The Body: Turn (do not chain 1 to avoid bulk). Work 10 sc across for 8 rows.
- The Head (Row 9-10):
- Row 9: Decrease in the first two stitches, sc 6, then decrease in the last two.
- Row 10: Working in back loops, decrease, sc 4, decrease.
- The Ears: Chain 3, slip stitch into the first chain, skip a stitch, sc, slip stitch, chain 3, and slip stitch back.
Part 3: Embroidery and Assembly
Once the body is complete, use a darning needle to add personality:
- Eyes: Position between rows 7 and 8. Use a French knot or simple embroidery. For colored eyes, wrap a small strand of blue or green yarn around the black stitch.
- Nose: Create a small “X” with pink yarn between rows 6 and 7.
Final Step: Align the bottom of the cat with the “Back Loop Only” ridge on your granny square. Use a long tail of yarn to sew the cat securely into place.
Turning it into a Pouch
If you make two squares, you can join them by facing the “good sides” together and single-crocheting around three edges. Flip it right-side out, add a row of chain-4 loops around the top opening, and thread a simple crochet chain through the loops to create a functional drawstring pouch!