Crochet Bandana Pattern Free
Video Tutorial Included
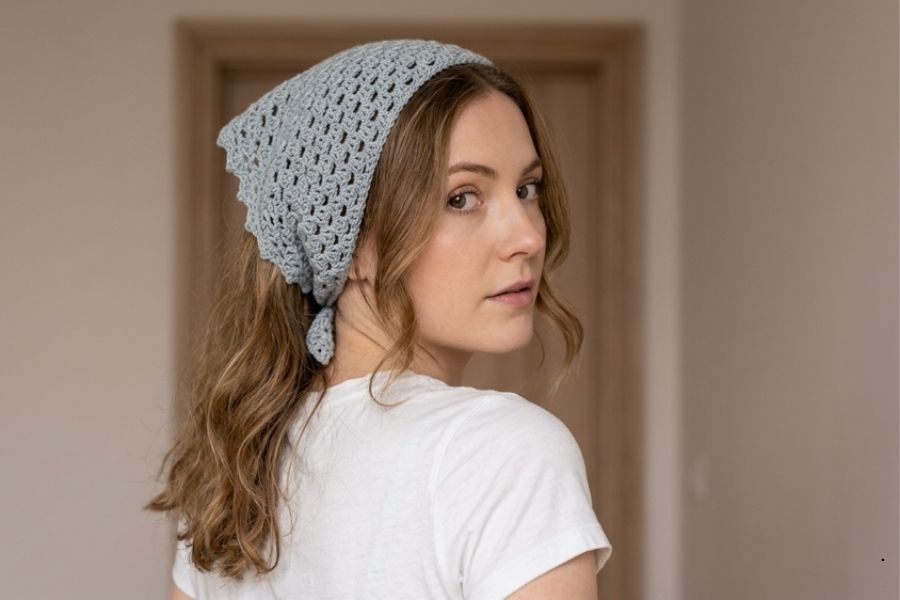
Looking for a stylish, retro accessory that is quick and simple to make? This beautiful granny stitch bandana is worked entirely in flat, straightforward rows from side to side, making it an incredibly beginner-friendly alternative to traditional triangle patterns. Finished with a delicate picot border and simple tie straps, it adds a perfect boho-chic touch to any outfit.
Materials Needed
- Yarn: Approximately 80 grams of lightweight bamboo yarn (such as Loops and Threads Silky Soft). A thinner yarn is highly recommended to give the finished project an elegant, lightweight drape.
- Crochet Hook: 5.0 mm hook (using a larger hook than recommended for the yarn helps maximize the soft drape of the fabric).
- Notions: Yarn needle, scissors, and a tape measure (optional, but very helpful).
Pattern Notes and Sizing
- Sizing Gauge: The triangle should be grown until it is large enough to drape over your head, reaching from just below one ear, over the crown, to just below the opposite ear.
- Row Count: It is crucial to work an odd number of rows to ensure the border pattern aligns perfectly. This pattern utilizes 27 rows, resulting in short sides measuring roughly 34 cm and a long side measuring roughly 48 cm.
- Stitch Definition: The starting chain 3 at the beginning of every row counts as a single double crochet. Three double crochets grouped together in the same space form a “cluster”.
Step-by-Step Main Triangle Instructions
Row 1
- Form a slip knot leaving a 5-inch tail. Chain 4.
- Work 2 double crochets into the very first chain made (the fourth chain from your hook). Along with the initial turning chain, this creates your very first 3-double-crochet cluster. Turn.
Row 2
- Chain 3 (counts as your first double crochet) and turn.
- Work 2 double crochets into the very first stitch of the row to complete a starting cluster.
- To finish the row, work a 3-double-crochet cluster directly into the open space located between the turning chain and the second-to-last double crochet of the previous row. Turn.
Row 3
- Chain 3 and turn. Work 2 double crochets into the very first stitch.
- Jump to the open space between the two clusters from the previous row, and work a 3-double-crochet cluster directly into that gap.
- Work a final 3-double-crochet cluster into the space between the turning chain and the adjacent double crochet at the end of the row. Turn.
Row 4 (and Repeating Rows)
- Chain 3 and turn. Work 2 double crochets into the very first stitch.
- Work a 3-double-crochet cluster into every open space between the clusters of the previous row.
- End the row by working a 3-double-crochet cluster into the space before the final turning chain.
- Continue repeating this sequence—adding one more intermediate cluster to each subsequent row—until you complete an odd number of rows (such as 27 rows) and achieve your desired size. Do not fasten off.
Strap and Decorative Picot Border Instructions
The straps and the edgings are worked sequentially around the raw edges of your triangle without breaking the yarn.
First Strap
- From the corner of your final row, extend a chain measuring roughly 22 cm long (approximately 40 chains).
- Turn your work and insert your hook into the second chain from the hook. Work 1 slip stitch (or a single crochet, if preferred) into each chain loop all the way back down to the base of the triangle.
Adding the Picot Border
- Rotate the bandana to work down the first short raw edge of the triangle. You will be placing single crochets into the side spaces of each row end.
- Into the side space of the first row, work 3 single crochets.
- To work a Picot: Chain 3. Insert your hook from the top down through the front “V” of the last single crochet just made, angling it out the left side underneath the two loops of the stitch. Yarn over and pull a loop through all of the loops on your hook to complete a slip stitch.
- Move to the next row space and work 3 single crochets. Move to the following row space and work another 3 single crochets (this gives you 6 single crochets separating your picots).
- Work another picot stitch using the same method.
- Repeat this alternating pattern (1 picot followed by 6 single crochets spread across two row ends) down to the bottom point of the triangle. Place a picot exactly at the bottom peak.
- Rotate the bandana and mirror the exact same stitch pattern up the second short raw side. End with 3 single crochets into the side of the very last row.
Second Strap and Finishing
- Chain 40 from the top corner to match the length of your first strap.
- Work 1 slip stitch back down into the second chain from your hook and into each remaining chain loop.
- Secure the strap back to the main body by working a final slip stitch into the side of the last single crochet of the border.
- Chain 1, cut the yarn leaving a 5-inch tail, and pull it secure.
Finishing Touches
- Thread the loose yarn tails onto a yarn needle.
- Flip the bandana to the back side and weave the needle under several stitch loops in one direction.
- Change directions and pass the needle under adjacent loops to firmly lock the yarn in place, ensuring the needle does not poke through to the front side.
- Pull the yarn slightly taut, snip off the excess tail close to the fabric, and smooth out the stitches to fully hide the ends.
Perfecting Fabric Drape and Movement
The beauty of a crochet hair accessory relies heavily on how softly it conforms to the shape of your head. Heavy, stiff stitches can cause the corners of a bandana to flare out unnaturally. To avoid this, selecting lightweight yarn lines consisting of bamboo, silk, or premium microfiber blends will make an immense difference. These fibers possess an inherently fluid weight that behaves smoothly under normal daily wear.
Tension Adjustments for Open Stitch Work
Granny clusters can occasionally become tight or bunched if your personal tension is naturally firm. Because this design skips spaces between stitch groupings, keeping your movements loose and sweeping is highly beneficial. If you notice your edges curling inward dramatically during the first few rows, it is an indication that your double crochets are too tight. Rather than stressing over modifying your natural hand-movements, simply increasing your hook size by half a millimeter will relax the overall fabric seamlessly.
Blocking and Edge Maintenance
Because a bandana is tied tightly around the head, the delicate picots along the borders can occasionally twist or fold over after washing. To restore crisp lines to your edging, manual wet-blocking is highly recommended. Wet the finished piece completely in cool water, gently squeeze out the excess moisture with a towel, and pin the triangle flat onto a foam surface. Ensure you pin each individual picot point outward so they dry in a sharp, distinct decorative pattern.
Video Tutorial
The below video contains all the steps you need to follow along visually and complete this beautiful granny stitch bandana from start to finish.