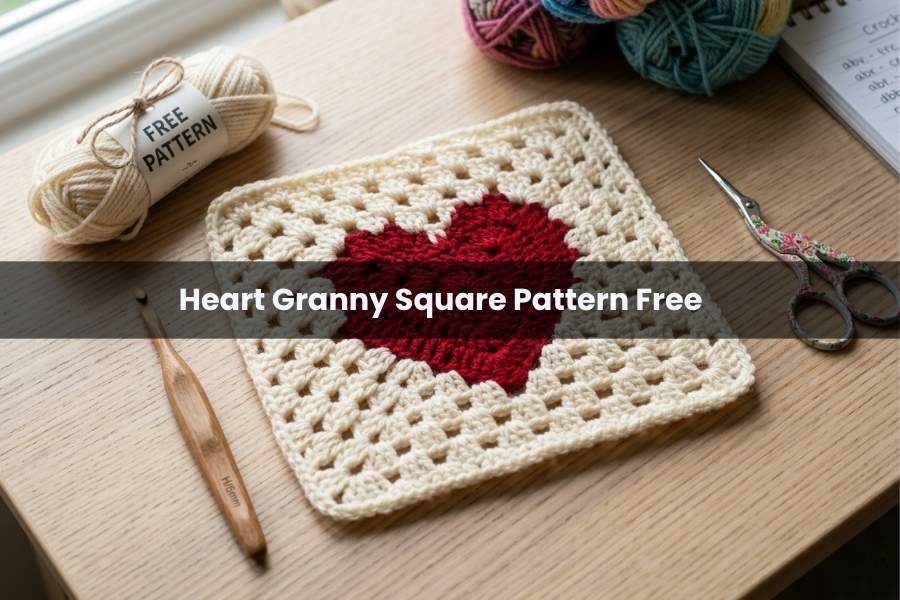
Cute Heart Granny Square Pattern Free Tutorial
Celebrate the season of love with a charming solid heart granny square. This versatile motif is perfect for creating festive blankets, cushion covers, or even romantic coasters. By combining a classic heart shape with a traditional square frame, you can create a durable and decorative piece suitable for various heartfelt handmade gifts.
Materials and Tools
To achieve the best results for this project, ensure you have the following supplies ready:
- Yarn: Two contrasting colors of DK/Light Worsted weight yarn (e.g., Drops Merino Extra Fine).
- Hook: Size G (4.0 mm) crochet hook.
- Notions: A darning needle for weaving in yarn tails and scissors for cutting.
Round 1: Creating the Foundation
Start by making a magic circle (or a chain-four circle if preferred).
- Work one half double crochet (hdc) into the circle.
- Work 11 double crochet (dc) into the circle for a total of 12 stitches.
- Pull the yarn tail to close the circle tightly.
- Join the round with a slip stitch into the top of the first hdc.
Round 2: Shaping the Heart
This round uses varying stitch heights to create the curves and point of the heart:
- Start with a single crochet (sc) in the first stitch. Skip the next stitch.
- In the following stitch, work 1 dc and 6 treble crochet (tr).
- Work 2 tr in the next stitch, followed by 2 dc in the next.
- Work 1 dc in the following stitch.
- To create the bottom point: In the next stitch, work 2 tr, chain 1, and 2 more tr.
- Mirror the first side: Work 1 dc in the next stitch, 2 dc in the next, and 2 tr in the following.
- In the next stitch, work 6 tr and 1 dc.
- Skip the last stitch and join with a slip stitch to the initial sc. Fasten off the heart color.
Round 3: Squaring Off the Motif
Attach the secondary color (e.g., cream) with a slip knot to the chain-1 space at the bottom tip of the heart.
- Work sc, hdc, and dc stitches along the sides to level the heart’s curves.
- Corners: Create corners by working 2 tr, chain 2, 2 tr (bottom corners) and 2 hdc, chain 2, 2 hdc (top corners) into designated stitches.
- The Center Dip: When reaching the top cleavage of the heart, work a long double crochet into the center of the heart from the previous round to bridge the gap.
- Join with a slip stitch. You should have 11 stitches on each side between the corner spaces.
Round 4: Final Expansion
- Chain 2 (counts as the first dc).
- Work 1 dc in each stitch across the sides.
- In each corner space, work 2 dc, chain 2, and 2 dc.
- By the end of this round, each side will have 15 double crochet stitches between the corner chain spaces.
- Join with a slip stitch to the top of the chain 2. Fasten off and weave in all ends.
Yarn Selection for Detail
When choosing yarn for a project involving intricate shapes like hearts, a high-twist yarn with good stitch definition is recommended. Smooth yarns, such as merino or cotton blends, allow the transitions between different stitch heights (like the jump from a single crochet to a treble) to look crisp rather than blurred.
Tension Management in the Magic Circle
Maintaining even tension while working the first 12 stitches into the magic circle is vital for a flat center. If the stitches are too tight, the heart may “bowl” or curve upward. Conversely, if they are too loose, the center hole may not close completely, which can affect the symmetry of the heart as you build subsequent rounds.
Color Contrast and Visibility
To make the heart motif truly stand out, choose a background color that provides a sharp contrast. A light or neutral background like cream, white, or soft grey makes a red or pink heart pop. This contrast also makes it easier to identify the stitch loops during Round 3, which is the most technical part of the squaring-off process.
The below video contains all the steps you need: