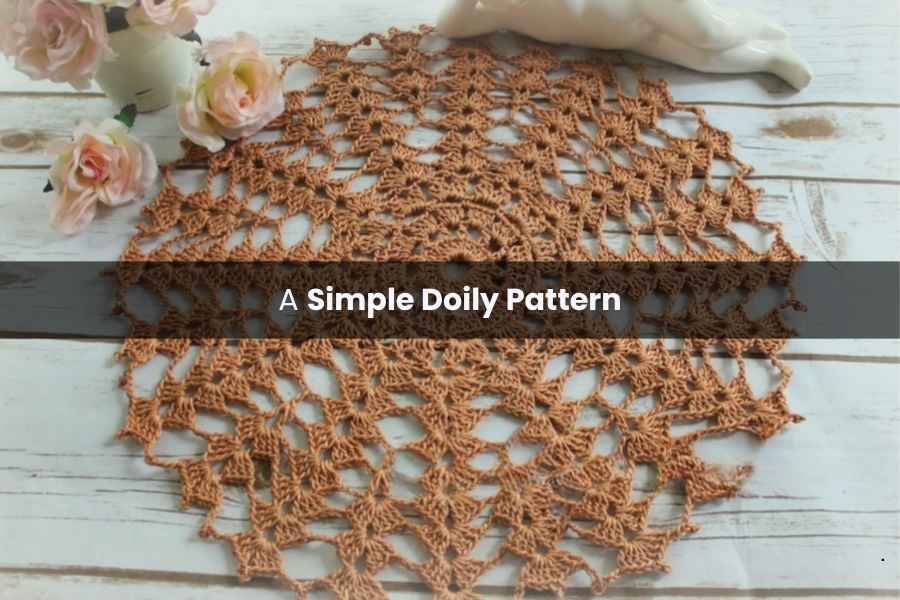
Master the Art of Thread Crochet: A Simple Doily Pattern
For many crochet enthusiasts, the transition from yarn to cotton thread can feel daunting. The smaller steel hooks and delicate fibers often seem intimidating. However, mastering thread crochet is a rewarding skill that opens up a world of elegant home decor.
If you are not quite ready for ultra-fine, lace-like projects, this tutorial is the perfect stepping stone. By using Aunt Lydia’s Cotton Thread Size 3 instead of the traditional, thinner Size 10, you can use a larger hook while still achieving a classic doily aesthetic.
Project Overview
This medium-sized doily measures approximately 14 inches across and consists of 14 rounds. It is designed to be approachable for beginners while teaching the fundamental rhythm of lace-work.
Materials
- Thread: 1 ball (approx. 140 yards) of Aunt Lydia’s Fashion Crochet Cotton, Size 3.
- Hook: 3.25 mm (Size D) aluminum hook.
- Tools: Scissors and a tapestry needle for weaving in ends.
Pattern Instructions
The Foundation & Early Rounds
Round 1: Chain 10. Join with a slip stitch to form a ring. Chain 3 (counts as first double crochet). Work 23 double crochets (DC) into the ring. Join with a slip stitch to the top of the beginning chain-3. (24 DC total).
Round 2: Chain 6 (counts as 1 DC + chain-3 space). Skip next DC, DC in next stitch, chain 3. Repeat from * to * around. Join with a slip stitch to the 3rd chain of the beginning chain-6.
Round 3: Slip stitch into the first chain-3 space. Chain 3, work 3 DC into the same space. Chain 1, work 4 DC in the next chain-3 space. Repeat from * to * around.
Pro Tip: To join this round, work a half-double crochet into the top of the beginning chain-3. This positions your hook perfectly in the center of the space for the next round.
Creating the Mesh & Clusters
Round 4: Chain 1, single crochet (SC) into the current space. Chain 5, SC in the next chain-1 space. Repeat around. Join with a slip stitch to the first SC.
Round 5: Slip stitch into the next chain-5 space. Chain 2, work 2 DC together (this counts as your first 3-DC cluster). Chain 3, work another 3-DC cluster into the same space. Chain 3, [3-DC cluster, chain 3, 3-DC cluster] in the next space. Repeat around. Join with a DC into the top of the first cluster to maintain position.
Round 6: Chain 1, SC in the same space. Chain 3, SC in the next chain-3 space. Repeat around. Join with a slip stitch to the first SC.
Developing the Shells
Round 7: Slip stitch into the next chain-3 space. Chain 3, 3 DC, chain 3, 4 DC in the same space (first shell made). Skip next chain-3 space, work a shell [4 DC, chain 3, 4 DC] in the next space. Repeat around. Join with a slip stitch.
Round 8: Slip stitch across to the center of the first shell. Work beginning shell. Chain 2, work shell in next shell’s chain space. Repeat around. Join.
Round 9: Same as Round 8, but increase to chain 3 between shells.
Round 10: Work beginning shell. Chain 3, DC in the 2nd chain of the previous chain-3 space, chain 3, shell in next shell. Repeat around. Join.
Round 11: Work beginning shell. Chain 3, [DC, chain 2, DC] in the next DC, chain 3, shell in next shell. Repeat around. Join.
Round 12: Work beginning shell. Chain 2, shell in the next chain-2 space (between the DCs), chain 2, shell in next shell. Repeat around. Join.
Round 13: Work beginning shell. Chain 3, shell in next shell. Repeat around. Join.
The Decorative Border
Round 14: Slip stitch to the center of the shell.
- Shell with Picot: Chain 3, 3 DC in space. Chain 3, slip stitch in 3rd chain from hook (Picot made). 4 DC in same space.
- Connecting Chain: Chain 5, slip stitch in 3rd chain from hook (Picot made), chain 3.
- Repeat: Work a [shell with picot] in the next shell, followed by the [connecting chain with picot].
Repeat this sequence around the entire perimeter. Join with a slip stitch, fasten off, and weave in your ends.
Care and Finishing
To make your stitches truly pop, blocking is highly recommended.
- Wet the doily with cool water and gently squeeze out the excess.
- Lay it flat on a blocking mat or towel.
- Pin the edges (especially the picots) to the desired diameter, ensuring the shape is perfectly circular.
- Let it air dry completely. This sets the stitches and gives the doily a professional, crisp finish.