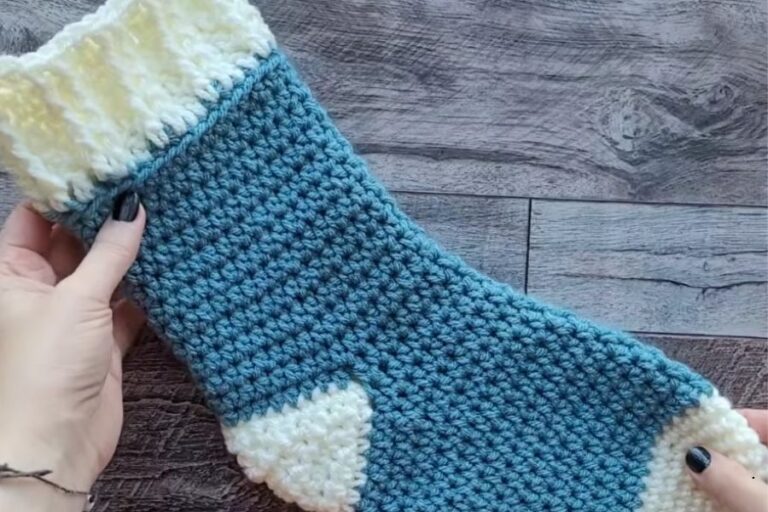
Cozy Crochet Spa Socks: A Beginner-Friendly Free Pattern
There is nothing quite like slipping into a pair of handmade socks after a long day. These Cozy Spa Socks are specifically designed for ultimate comfort and skin care. Perfect for pampering dry feet, you can apply your favorite lotion before bed, slip these on, and wake up to soft, rejuvenated skin.
Because they are worked in a spiral from the toe up, there is no seaming required. This makes them a quick, satisfying project for beginners and experienced crocheters alike.
Materials Needed
To achieve that signature “spa” feel, look for a soft polyester or microfiber yarn.
- Yarn: Bulky weight (Category 5 or 6) Chenille or Blanket yarn (e.g., Bernat Blanket). One ball is typically enough for 2–3 pairs.
- Hook: 9.0 mm (Size M/N) crochet hook.
- Tools: Stitch marker, tapestry needle, and scissors.
Pattern Instructions
1. The Toe
We begin at the tip of the toe using a magic circle (or a loose slip knot).
- Round 1: Work 10 single crochet (SC) stitches into the magic circle. Pull the tail to close the circle. Slip stitch into the first SC to join. (10 sts)
- Round 2 (Setting up the Linen Stitch): Chain 1 (counts as your first SC). Place a stitch marker in this chain. Chain 1 again, then SC in the next stitch.
- Continue: Chain 1, SC in the next stitch around. Do not join with a slip stitch; we will now work in a continuous spiral.
2. The Body of the Sock
The body is worked in the Linen Stitch (also known as the Moss Stitch), which creates a flexible fabric that isn’t too stiff.
- Round 3: Skip the marked stitch. Work your first SC into the first chain-1 space of the previous round. Move your marker up to this new stitch.
- Pattern: Chain 1, skip the next SC, work 1 SC into the next chain-1 space.
- Growth: Continue this spiral until the piece measures 7 inches from the toe (approximately 11 rounds for most medium sizes).
3. The Ankle Opening
Now, we create the “hole” where your foot enters the sock.
- At the start of the next round, instead of working into the chain space, chain 9.
- Skip 5 SC from the row below.
- Work a SC into the chain space immediately following the fifth skipped SC. This closes the loop and creates the ankle opening.
- Continue the Linen Stitch pattern around until you reach the chain-9.
4. Re-establishing the Pattern
- Work into the chain-9 as follows: 1 SC in the first chain, chain 1, skip 1 chain, 1 SC in the next.
- Repeat this across the chains to reset the Linen Stitch pattern for the leg.
- Work one additional round of standard Linen Stitch (SC in chain spaces, chain 1 between) before starting the heel.
5. Closing the Heel
To finish the sock, we close the back of the heel.
- Round 1 (Closing): Work 1 SC into every chain space without chaining between them. This will effectively cut your stitch count in half.
- Round 2 (Decreasing): Work a series of SC decreases (insert hook, pull up loop, insert into next stitch, pull up loop, yarn over, and pull through all three).
- Continue decreasing until only a tiny hole remains.
Finishing Touches
- Fasten off, leaving a short tail.
- Use a tapestry needle to weave the tail through the remaining stitches, pulling tight to close any gap.
- Weave in all ends securely on the inside of the sock.
Sizing and Tension Tips
Because this pattern uses bulky blanket yarn, a small change in tension can significantly impact the final size.
- Tension Matters: If your socks feel too loose, try focusing on a tighter, more consistent tension or drop down to an 8.0 mm hook.
- The “Rule of Three”: These socks work up so quickly (often in under 30 minutes) that it is sometimes helpful to make three individual socks and pick the two that match the most perfectly in size and tension.
- Gift Idea: Pair these with a high-quality foot lotion or a lavender-scented candle for a thoughtful, handmade spa gift set.