Endless Eyelets Granny Cardigan Pattern
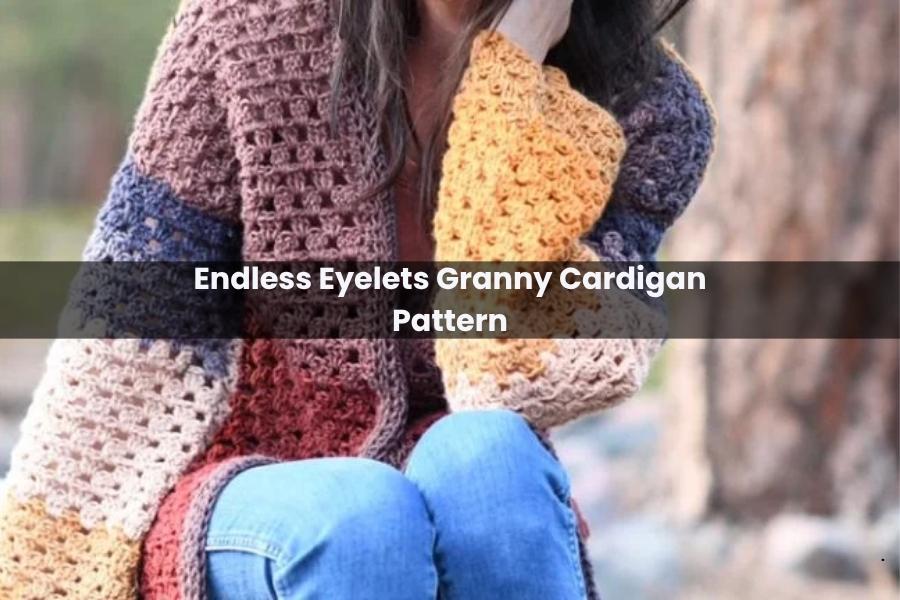
There is something uniquely comforting about a project that feels like a warm hug before you even put it on. If you are looking for that perfect blend of classic crochet charm and a modern, airy silhouette, the Endless Eyelets Granny Cardigan is about to become your new favorite wardrobe staple.
Using the beautifully transitioning tones of Mandala yarn, this cardigan is worked in the timeless granny stitch, creating a lightweight fabric that drapes effortlessly. Whether you’re a seasoned pro or a beginner looking to move into garments, I’m here to walk you through every stitch!
What You’ll Need
- The Yarn: Lion Brand Mandala Light #3 (I used the shade “Centaur” for those gorgeous, earthy transitions).
- The Measurements: You’ll need approximately:
- Small: 470g
- Medium: 562g
- Large: 660g
- XL: 767g
- XXL: 883g
- Hook: US Size J (6.0 mm).
- The Gauge: 12 dc stitches x 7 rows in granny stitch should give you a 4” x 4” square.
- Essentials: Scissors and a tapestry needle for weaving in those ends.
Finding Your Fit
This pattern is designed with comfort in mind. Here is the finished bust sizing:
- S: 40” | M: 44” | L: 48” | XL: 52” | XXL: 56”
The Stitch Pattern
We will be using standard crochet abbreviations. If you see “sp,” that refers to the space between those 3-dc clusters.
The Back Panel
Ch 62 (68, 74, 80, 86).
- Row 1: Sc in 2nd ch from hook and in each ch across. (61, 67, 73, 79, 85 sts)
- Row 2: Ch 3 (counts as 1 dc), turn. Dc in the same st as ch 3. *Sk 2 sts, 3 dc in next st; rep from * across until the last st. Make 2 dc in the last st.
- Row 3: Ch 3 (counts as 1 dc), turn. 3 dc in every sp between the dc groups across. End with 1 dc in the top of the last st.
- Row 4: Ch 3 (counts as 1 dc), turn. Dc in the same st as ch 3. 3 dc in each sp across. End with 2 dc in the last st.
- Repeat Rows 3 & 4 until your panel is roughly 29” (31.5”, 34”, 36.5”, 39”) long. Fasten off.
Front Panels (Make 2)
Ch 26 (29, 32, 35, 38).
- Row 1: Sc in 2nd ch from hook and in each ch across. (25, 28, 31, 34, 37 sts)
- Rows 2-4: Follow the same stitch pattern as the back panel.
- Repeat Rows 3 & 4 until your front piece matches the exact length of your back panel. Fasten off.
The Sleeves (Make 2)
Ch 47 (50, 53, 53, 56).
- Row 1: Sc in 2nd ch from hook and in each ch across. (46, 49, 52, 52, 55 sts)
- Row 2: Ch 3 (counts as 1 dc), turn. Dc in the same st as ch 3. *Sk 2 sts, 3 dc in next st; rep from * across until the last st. Make 2 dc in the last st.
- Row 3: Ch 3 (counts as 1 dc), turn. 3 dc in the first sp and each subsequent sp across. End with 1 dc in the top of the last st.
- Row 4: Ch 3 (counts as 1 dc), turn. Dc in the same st as ch 3. 3 dc in each sp across. End with 2 dc in the last st.
- Repeat Rows 3 & 4 until the sleeve measures approx. 18.5” (19, 19.5”, 19.5”, 20”). Fasten off.
Putting It All Together
This is where you see your hard work turn into a real sweater!
- Shoulders: Lay your front panels on top of the back panel. Align the outer edges, leaving the center open for your neck. Use a whip stitch to seam the shoulders.
- Sides: Seam the front and back panels at the sides, but remember to leave a wide enough opening for the armholes.
- Sleeves: Fold your sleeves lengthwise and seam the long edge to make a tube. Attach them to the armholes, making sure the seams line up at the underarm.
- My Tip: Always seam with the “right sides” facing inward for the cleanest look!
The Collar
To finish it off, we’ll add a soft, ribbed-style collar. Attach your yarn at the bottom inner corner of a front panel.
- Row 1: Ch 2. Work hdc evenly all the way up the front, around the neck, and down the other side.
- Row 2: Ch 2, turn. Hdc in the Front Loop Only (flo) of each st across.
- Rows 3-4: Repeat Row 2.
- If you love a chunky, oversized collar, keep repeating Row 2 until it’s as wide as you like!
Finishing Touches
You’ve done it! All that’s left is to weave in any remaining ends with your tapestry needle. I highly recommend blocking your cardigan—it helps open up those “eyelets” in the granny stitch and gives it a professional, store-quality drape.
Enjoy your new Endless Eyelets Cardigan! It’s perfect for those chilly mornings or as a breezy layer for a summer evening. Happy crocheting!