Crochet Bag Pattern Free
Video Tutorial Included
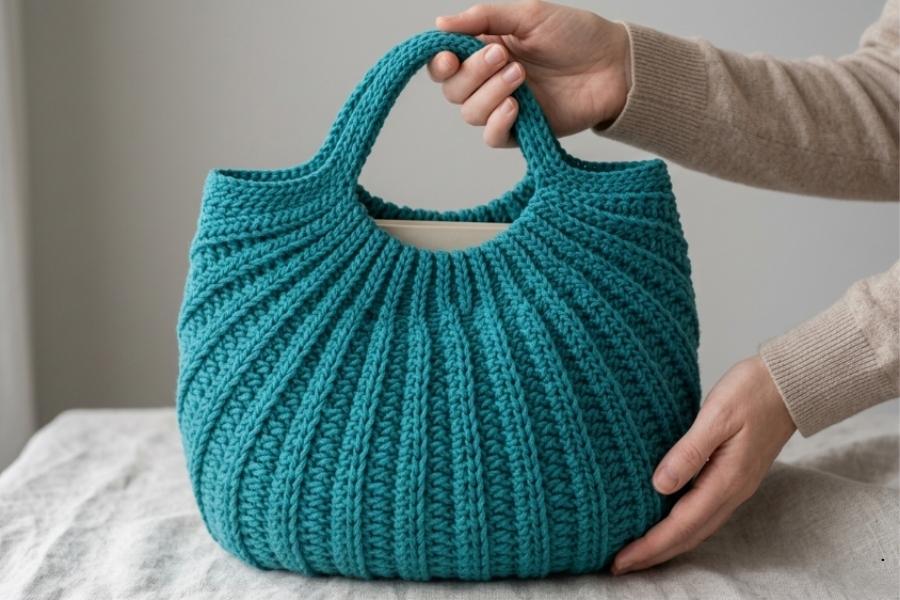
This free crochet pattern guides you through crafting a beautiful green pumpkin bag. This project results in a practical, handmade accessory that is perfect for daily outings or gifting.
Utilizing a unique ribbed texture, the construction relies on simple stitches, making it highly accessible and beginner-friendly.
Materials Needed
- Yarn: 3 mm yarn (Green color used in this project)
- Crochet Hook: 4 mm crochet hook
Round 1: Foundation and Initial Base Shape
The first round establishes the foundation chain and defines the basic shape of the pumpkin bag. Take your time to ensure your stitch count is exact.
- Start by making 30 chains.
- Work 7 slip stitches, followed by 3 single crochets.
- Crochet 4 half double crochets, then transition to 5 half double crochets in the center.
- Continue with 4 half double crochets, 3 single crochets, and finish the row with 7 slip stitches.
- Chain 1 and turn your work.
Round 2: Introducing the Ribbed Texture
From this round forward, working into a specific loop creates a beautiful, defined texture.
- Work entirely in the back loop only (BLO).
- Crochet 7 slip stitches, 3 single crochets, and 6 half double crochets.
- Work 5 half double crochets in the center.
- Follow with 6 half double crochets, 3 single crochets, and finish with 7 slip stitches.
- Chain 1 and turn your work.
Round 3: Expansion of the Base
This round continues to expand the fabric subtly to build the structured profile of the bag.
- Work in the back loop only (BLO).
- Crochet 7 slip stitches, 3 single crochets, and 8 half double crochets.
- Work 5 half double crochets in the center loop area.
- Follow with 8 half double crochets, 3 single crochets, and 7 slip stitches.
- Chain 1 and turn your work.
Round 4: Continuing the Increase
The body expands further as you maintain a steady, even tension to keep the edges neat.
- Work in the back loop only (BLO).
- Crochet 7 slip stitches, 3 single crochets, and 10 half double crochets.
- Work 5 half double crochets in the center.
- Complete the row with 10 half double crochets, 3 single crochets, and 7 slip stitches.
- Chain 1 and turn your work.
Rounds 5 to 10: Shape Development
The below video contains all the steps you need to complete these rows safely and accurately. Keep your stitches even as the distinct pumpkin silhouette becomes clearer with each passing round.
Rounds 11 to 30: Building the Main Body
These rounds establish the uniform depth and main storage compartment of the bag.
- Work all stitches in the back loop only (BLO).
- Crochet 7 slip stitches, 3 single crochets, 49 half double crochets, 3 single crochets, and 7 slip stitches.
- Chain 1 and turn your work at the end of each individual round.
Round 31: Beginning the Top Shaping
Decreases are now introduced to gradually taper the opening and form the upper curves of the pumpkin shape.
- Crochet 7 slip stitches, 3 single crochets, and 22 half double crochets.
- Work 1 decrease stitch.
- Follow with 22 half double crochets, 3 single crochets, and 7 slip stitches.
- Chain 1 and turn your work.
Round 32: Continued Tapering
The upper opening continues to pull inward systematically.
- Crochet 7 slip stitches, 3 single crochets, and 20 half double crochets.
- Work 1 decrease stitch.
- Follow with 20 half double crochets, 3 single crochets, and 7 slip stitches.
- Chain 1 and turn your work.
Rounds 33 to 40: Final Closing Rows
The below video contains all the steps you need to complete the main body panels. Following these steps carefully ensures the final structural panels balance perfectly to form a neat opening.
Creating and Strengthening the Handles
A sturdy strap ensures your handmade bag is functional for daily carry and maintains its shape over time.
- For the back handle foundation, chain 60 stitches.
- Make 29 slip stitches back along the length of the chain.
- Chain another 60 stitches and work 29 slip stitches back.
- For rounds 2 through 4, reinforce the handle structure by crocheting 178 slip stitches uniformly all the way around the strap area to maximize durability.
Stitch Tension and Fabric Density
Achieving a balanced stitch tension is paramount when crafting functional containers like bags. If your stitches are executed too loosely, the fabric will stretch significantly under the weight of everyday items, causing the pumpkin shape to sag. Maintaining a firm, steady tension ensures that the half double crochets stack tightly together, providing a durable shell that holds its form even when filled.
The Significance of Back Loop Crochet
Working exclusively into the back loops does more than simply offer visual appeal. The resulting ridges mimic the natural segments of a pumpkin while granting the fabric excellent structural elasticity. This ribbing allows the bag to expand slightly to accommodate bulky contents without permanently warping the overall shape or stretching the base stitches out of alignment.
Strap Longevity and Structural Support
Bag handles endure the highest amount of physical stress during daily use. Utilizing dense rows of slip stitches around the chain core minimizes the natural elasticity of the yarn, preventing the strap from lengthening awkwardly over time. Securing the handle roots deep into the body panels ensures that weight is distributed evenly across the textured ridges of the bag.
The below video contains all the steps you need.
Video Tutorial
For a complete visual walkthrough of the row transitions, stitch charts, and handle assembly, you can watch the full process here: