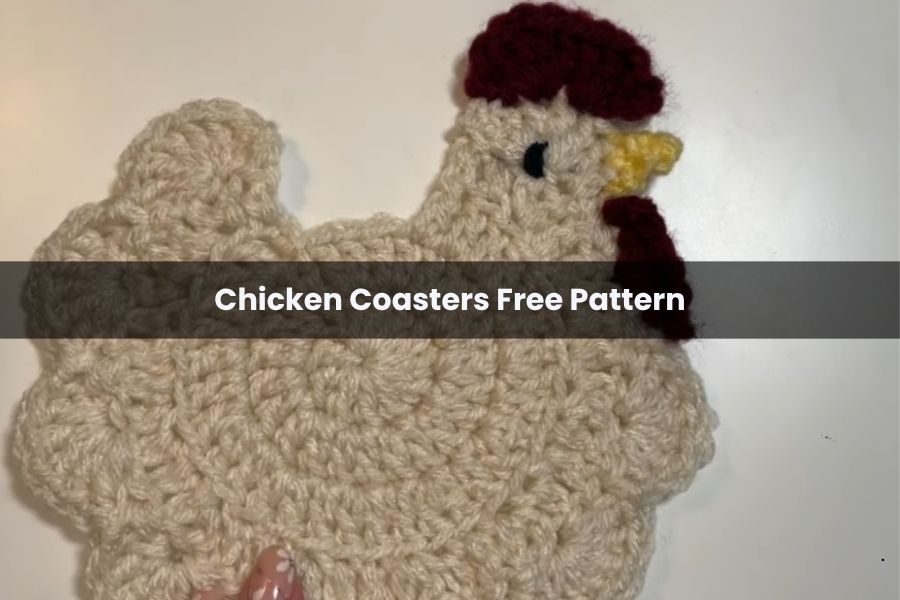
Chicken Coasters Free Pattern
Looking for a fast, beginner-friendly project that adds a touch of rustic charm to your home? These crochet chicken coasters take only 20 to 30 minutes to complete. Whether you use them to protect your wooden surfaces or hang them as wall decor, they are a whimsical addition to any kitchen or dining room.
Materials Needed
- Cotton Yarn: White (body), Red (comb and wattle), and Yellow (beak).
- Black Yarn or Embroidery Thread: For the eye.
- Crochet Hook: Sized appropriately for your yarn (commonly 4.0mm or 5.0mm).
- Tapestry Needle: For weaving in ends and sewing the eye.
- Scissors
Pattern Instructions
Step 1: The Body (Magic Ring & Rounds 1-2)
- Magic Ring: Start with a magic ring. Chain 3 (counts as your first double crochet).
- Round 1: Work 11 double crochets (dc) into the ring. Pull the tail tight to close. Slip stitch into the top of the starting chain-3 to join. (Total: 12 stitches).
- Round 2: Chain 3. In the same space as the slip stitch, work 1 dc. Work 2 dc into every stitch around. Slip stitch to join. (Total: 24 stitches).
Step 2: Expanding the Circle (Round 3)
- Chain 3. Work 2 dc in the first stitch, then 1 dc in the next.
- Repeat the pattern (2 dc, 1 dc) until you have 30 stitches total.
- Stop when you have 3 unworked stitches remaining from the previous row. This gap creates the neck area.
Step 3: Creating the Decorative Ridge (Round 4)
- Chain 3 and turn your work.
- Skip the first stitch. Working in the front loops only (FLO):
- Work 1 dc in the next stitch, 2 dc in the following.
- Follow a sequence of 1, 1, 2 dc around.
- Continue this pattern until the end of the row. You should have 40 stitches total. This row creates a beautiful raised line on the coaster.
Step 4: The Shell Border (Ruffles)
- Chain 1 and turn.
- Shells: Skip the first stitch. In the second stitch, work 6 dc (this forms the shell).
- Skip the next stitch, then slip stitch into the following stitch.
- Repeat this process until you have 8 shells along the body.
Step 5: The Head
- After the 8th shell, work 5 single crochets (sc) in the next 5 stitches.
- In the next stitch, work 6 dc to create the head shell.
- Skip one stitch and slip stitch into the top of the turning chain. Fasten off the white yarn.
Adding the Details
The Wattle (Red Yarn)
- Join red yarn at the first single crochet of the neck area. Chain 2.
- Work 1 sc in the same stitch.
- In the space directly below (the row beneath the sc), work 3 sc into the same hole.
- Work 1 sc into each of the next two stitches. Chain 1 and fasten off.
The Comb (Red Yarn)
- On top of the head shell, skip three stitches and join red yarn in the fourth. Chain 4 (counts as dc + chain 1).
- In the same stitch: 1 dc, chain 1, 2 dc.
- In the next stitch: 2 dc, chain 1, 2 dc.
- In the next stitch: 1 dc.
- Slip stitch into the final stitch of the head and fasten off.
The Beak (Yellow Yarn)
- Join yellow yarn in the stitch right next to the wattle. Chain 2.
- Work 1 sc in each of the next 2 stitches.
- Turn your work. To create the point, perform a decrease (sc2tog) across those two stitches.
- Chain 1 and fasten off.
The Eye
- Using a tapestry needle and black yarn, identify the center of the head shell.
- Thread the yarn through to the middle and make several small stitches in the same spot to create a bold “seed” eye.
- Weave the tail through the back of the white stitches to hide it, then snip the ends.
Finishing Touches
Weave in all remaining yarn tails using your tapestry needle. For a professional look, “block” your coasters by lightly steaming them or wetting them and laying them flat to dry. This ensures they sit perfectly flat on your table.
Tip: These make excellent gifts! Bundle a set of four with a rustic ribbon for a perfect handmade housewarming present.
Was this helpful?
Thanks for your feedback!