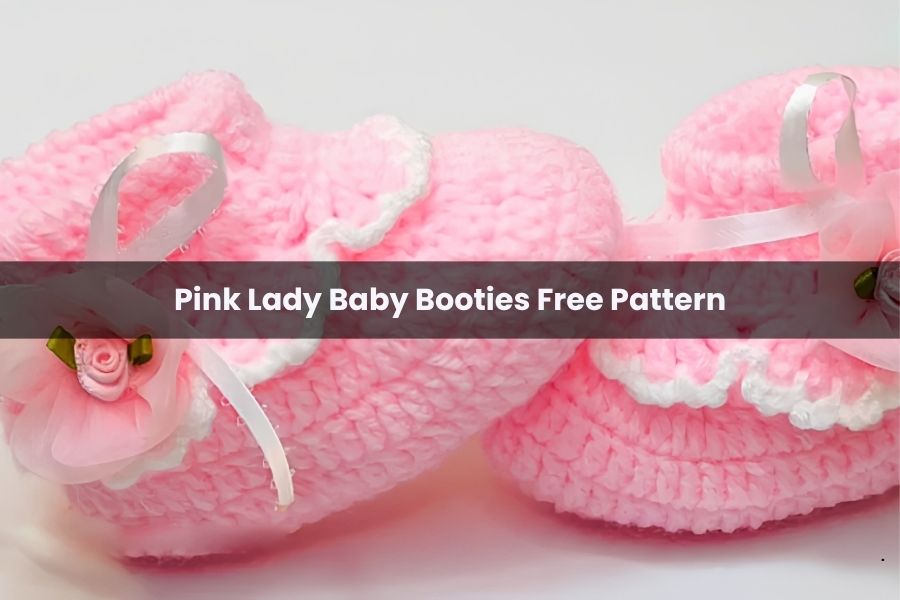
Pink Lady Baby Booties Free Pattern
There is nothing quite like the feeling of finishing a handmade gift for a little one. Today, I am so excited to share one of my favorite projects: the Pink Lady Baby Booties.
These sweet, vintage-style shoes were designed to be part of a complete set—perfectly matching a little dress and diaper cover. If you are looking for a project that is as functional as it is adorable, these booties are the perfect fit.
Pattern Details
- Size: 6–9 Months (Sole measures approximately 11 cm or 4.5 inches).
- Hook Size: 3.0 mm crochet hook.
- Yarn: Super soft baby double knit (DK) in pink and white.
- Difficulty: Intermediate (includes basic stitches, decreases, and post stitches).
Phase 1: Crafting the Sole
The foundation of a good bootie is a sturdy, oval sole. We will work in rounds around a foundation chain.
- Foundation: Chain 17.
- Row 1: Double crochet (dc) in the 3rd chain from the hook and in each chain until the last one. In the last chain, work 7 dc. Turn to work along the opposite side of the chain, making 14 dc. In the very last space, work another 7 dc. Join with a slip stitch to the first dc (not the chains). You should have 42 stitches.
- Row 2: Chain 2. Work 14 dc. In the next 7 stitches (the curve), work 2 dc in each stitch (14 total for the curve). Work 14 dc down the other side. In the final 7 stitches, work 2 dc in each stitch. Join with a slip stitch. Total count: 56 stitches.
Measurement Check: The sole should now be roughly 11 cm long.
Phase 2: The Sides and Shaping
Now we build the height and shape the toe area.
- Row 1 & 2 (Sides): Chain 2. Work 1 dc in each stitch around. Join with a slip stitch. (56 stitches per row).
- Row 3 (Initial Reductions): Work 16 dc. Now, we shape the toe by working 12 double crochet decreases (dc2tog) across the front 24 stitches. Finish the row with 16 dc. Join. (Total: 44 stitches).
- Row 4: Work 12 dc. Work 2 dc2tog, then work 10 more dc2tog across the previous decreases. Finish with 12 dc. Join. (Total: 34 stitches).
- Row 5: Work 10 dc, 2 dc2tog, 6 dc, 2 dc2tog, and finish with 10 dc. Join. (Total: 30 stitches).
Phase 3: The Ankle and Decorative Cuff
To give these booties a snug fit and a beautiful “boutique” look, we use post stitches and fans.
- Rows 6 & 7 (The Ribbing): Chain 1. Alternate Front Post Double Crochet (FPDC) and Back Post Double Crochet (BPDC) around the 30 stitches. This creates a stretchy, ribbed ankle.
- Rows 8–10 (The Fold): Chain 2 and turn your work. We work these rows from the inside out so that when the cuff is folded down, the “right side” of the stitches faces out. Work 3 rows of plain dc (30 stitches each).
- Row 11 (Increase Row): Chain 2. Work 4 dc, then 2 dc in the 5th stitch. Repeat this around to expand the cuff for the fans. (Total: 36 stitches).
- Row 12 (The Fans): Chain 4. In the same stitch, work 5 dc, each separated by a chain-1. Skip 4 stitches, and in the 5th stitch, work 6 dc separated by chain-1. Repeat around.
Phase 4: Delicate Edging & Finishing
Switch to your white yarn for a crisp, lacy finish.
- The Scallop Edge: Attach white yarn between two fans. Chain 4, slip stitch into the next ch-1 space. Repeat this across the top of each fan. When you reach the gap between fans, slip stitch into the center to anchor it. This creates a beautiful, frothy “picot” effect.
Personalizing Your Booties
The best part of making these is the “fudge factor” and the decorations!
- Ribbon: Weave a 3/16″ (4.8 mm) ribbon through the second-to-last row of double crochets on the cuff. Tie it into a dainty bow on the outer side of each foot.
- Flowers: I love to sew a tiny fabric flower or crochet a small rosebud into the center of the bow.
- Sizing Tip: If you want these smaller (0–3 months), use a 2.5 mm hook and slightly thinner yarn. For larger sizes, bump up to a 3.5 mm hook.
These booties are more than just footwear—they are a keepsakes. I hope you enjoy the process of watching these tiny shoes take shape!
Happy crocheting!