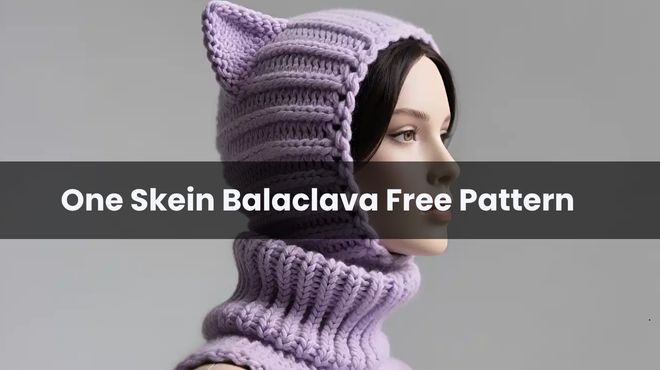
One Skein Balaclava Free Pattern
There is nothing quite like the satisfaction of turning a single, lonely skein of yarn into something as functional and stylish as a balaclava. It’s the ultimate “one-and-done” project. Whether you’re prepping for a ski trip or just want to stay warm during those biting winter commutes, this One Skein Balaclava is a total game-changer.
The best part? It uses the Mini Bean stitch, which creates a thick, textured fabric that feels incredibly premium and traps heat like a dream.
What You’ll Need
One of the reasons I love this pattern is that it doesn’t require a huge haul from the craft store. You likely already have this in your stash!
- Yarn: Approximately 300 yards of your favorite worsted weight yarn.
- Hook: A Size J/6 mm crochet hook. This slightly larger hook gives the piece a wonderful drape.
- Tools: A stitch marker (essential for keeping track of your center!) and a tapestry needle.
The Technical Stuff
- Gauge: 7 Mbs x 10 rows = 4″ square.
- Terminology: We’re working in standard US terms.
A Few Notes Before We Dive In
We are going to start at the center back of the head and work vertically, building outward to create the hood first. Once that’s done, we’ll move on to the chin, bottom edging, and face trim.
- Fsc (Foundation single crochet): This gives a much stretchier start than a standard chain.
- Mb (Mini Bean stitch): This is where that gorgeous texture comes from.
- Keep it Center: Make sure to move your stitch marker up to the center-most stitch of each round to keep your increases perfectly symmetrical.
The Pattern
The Foundation
- Foundation row: Fsc-32. (If you prefer a classic start, Ch-33 and sc in the 2nd ch from hook and each ch across). [32 sts]
Building the Hood
- Round 1: Ch-1, turn, sk first st, Mb in next. *sk next st, Mb in next; repeat 13 more times. Sk next st, Mb in last. Now, rotate the work and Mb in the side of that final st. Rotate again and Mb in the opposite side of the foundation. Repeat 15 more times. [33 Mbs]
- Round 2: Ch-1, turn. Mb in the side of the next 16 Mbs. Work 3 Mbs into that center-marked st. Mb in the side of the remaining 16 Mbs. [35 Mbs]
- Round 3: Ch-1, turn. Mb in next 17 Mbs, 3 Mb in center st, Mb in next 17 Mbs. [37 Mbs]
- Round 4: Ch-1, turn. Mb in each Mb around—no increases here! [37 Mbs]
- Round 5: Ch-1, turn. Mb in next 18 Mbs, 3 Mb in center st, Mb in next 18 Mbs. [39 Mbs]
- Round 6: Ch-1, turn. Mb in each Mb around. [39 Mbs]
- Round 7: Ch-1, turn. Mb in next 19 Mbs, 3 Mb in center st, Mb in next 19 Mbs. [41 Mbs]
- Round 8: Ch-1, turn. Mb in each Mb around. [41 Mbs]
- Round 9: Ch-1, turn. Mb in next 20 Mbs, 3 Mb in center st, Mb in next 20 Mbs. [43 Mbs]
- Round 10: Ch-1, turn. Mb in each Mb around. [43 Mbs]
- Round 11: Ch-1, turn. Mb in next 21 Mbs, 3 Mb in center st, Mb in next 21 Mbs. [45 Mbs]
- Rounds 12 – 24: Ch-1, turn. Mb in each Mb around. [45 Mbs]
- Rows 25 – 46: Ch-1, turn. Now, we’re only working on 8 Mbs to build the side. [8 Mbs]
Important: Do not fasten off! We’re going to use this yarn to jump right into the edging.
The Bottom Edging
- Connection: Sl st to the other side of the bottom to join the piece.
- Row 1: Ch-1, hdc evenly across the bottom. Join to your first st. [69]
- Row 2: Ch-1 (do not turn). Fpdc around next, Bpdc around next; repeat around. Fpdc in the last st. Join. [69]
- Row 3: Ch-1, turn. Bpdc around next, Fpdc around next; repeat around. Bpdc in the last st. Join. [69]
- Row 4: Ch-1, turn. Fpdc around next, Bpdc around next; repeat around. Fpdc in the last st. Join. [69]
- Rows 5 & 6: Repeat rows 3 & 4. [69]
- Finish: Fasten off using an Invisible Join and weave in those ends.
The Face Edging
- Leave a long tail (you’ll need it for seaming later!). Attach your yarn at the face opening.
- Row 1: Ch-1, hdc evenly around the entire face opening. Join to the top of your first st. [77]
- Row 2: Ch-1 (do not turn). Fpdc around next, Bpdc around next; repeat around. Fpdc in the last st. Join. [77]
- Row 3: Ch-1, turn. Bpdc around next, Fpdc around next; repeat around. Bpdc in the last st. Join. [77]
- Row 4: Ch-1, turn. Fpdc around next, Bpdc around next; repeat around. Fpdc in the last st. Join. [77]
- Final Assembly: Fasten off using an Invisible Join. Now, take that long tail and your needle and seam the 8-stitch width across the chin.
And there you have it! Weave in any remaining ends and give it a quick steam if you want the stitches to settle. Your One Skein Balaclava is ready for its first outing.
It feels so good to create something so practical from just one ball of yarn. Enjoy the warmth!