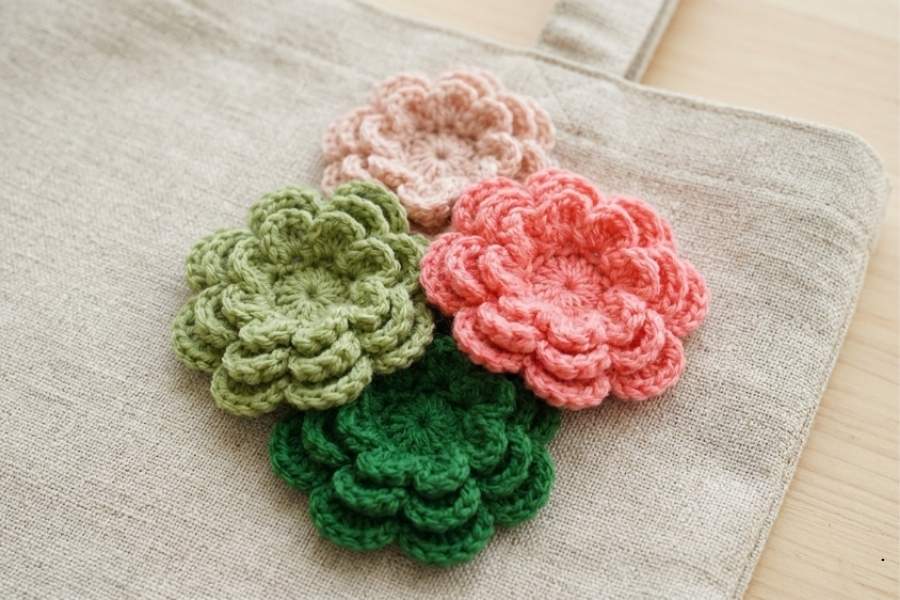
Crochet Flowers Free Pattern
Crochet flowers are a versatile and delightful way to add a handmade touch to your projects, whether you are embellishing a cozy beanie, creating a statement headband, or designing unique home decor.
This guide provides a clear path to crafting a stunning, texturized three-layer flower featuring eight delicate petals on each layer.
Materials Needed
- Yarn: Any yarn of your choice (Medium weight acrylic yarn is used in this guide, but thinner options like mohair also work beautifully).
- Crochet Hook: A 5 mm hook (or the size recommended on your yarn label).
- Scissors
- Yarn Needle
Round 1: Creating the Foundation
To begin the flower, form a magic loop (or magic circle).
- Chain 1 (this does not count as a stitch).
- Work 16 half double crochets (hdc) directly into the center of the magic loop.
- Count your stitches to ensure you have exactly 16 half double crochets.
- Slip stitch into the top of the very first half double crochet to close the round.
- Pull the yarn tail firmly to close the hole in the center.
Round 2: Setting Up the First Petal Base
This round establishes the chain spaces required to build your first set of petals.
- Chain 2.
- Skip the immediately following stitch, then slip stitch into the next stitch.
- Chain 2, skip the next stitch, and slip stitch into the following stitch.
- Repeat this pattern around the circle until you have created 7 chain-2 spaces.
- For the 8th space, chain 2 and slip stitch directly into the very first chain-2 space of the round. You should now have a total of 8 chain-2 spaces.
Round 3: Layer 1 Petals
Now you will build the first, smallest layer of petals into the loops created in the previous round.
- Chain 2.
- Work 3 double crochets (dc) into the same chain-2 space.
- Chain 2, then slip stitch into that same chain-2 space to finish the first petal.
- To start the next petal, slip stitch into the next available chain-2 space.
- Chain 2, work 3 double crochets, chain 2, and slip stitch into the same space.
- Repeat this process for all remaining chain-2 spaces until you have completed 8 petals. Slip stitch into the base of the final space to finish the layer.
Round 4: Setting Up the Second Petal Base
To create a multi-layered effect, you will now work behind the first layer using back post techniques.
- Keep your loop on the hook. Insert your hook from the front to the back around the post/bar located between the 8th and 1st petal of Round 2.
- Yarn over, pull the loop through, and execute a slip stitch around the post.
- Chain 4.
- Move to the next post between the petals, insert your hook around it from front to back, yarn over, and slip stitch.
- Repeat this sequence (chain 4, slip stitch around the next post) all the way around.
- End the round by slip stitching into the very first chain-4 space. You will have 8 chain-4 spaces hidden slightly behind your first layer of petals.
Round 5: Layer 2 Petals
This layer uses the same basic concept as the first layer but features slightly larger petals.
- Chain 2.
- Work 4 double crochets into the first chain-4 space.
- Chain 2, then slip stitch into the same chain-4 space.
- Move to the next chain-4 space by executing a slip stitch into it.
- Chain 2, work 4 double crochets, chain 2, and slip stitch into the same space.
- Repeat this sequence around until you have 8 mid-sized petals. Finish by slip stitching into the final space.
Round 6: Setting Up the Third Petal Base
This round creates the final, widest foundation loops behind the second layer.
- Insert your hook from front to back around the post of the layer 2 base (ensuring you do not catch any stitches from the first layer).
- Yarn over and pull through to make a slip stitch around the post.
- Chain 6.
- Slip stitch around the next post in the sequence.
- Repeat this pattern (chain 6, slip stitch around the post) around the flower.
- Finish by slip stitching into the first chain-6 space of the round, giving you 8 large loops in total.
Round 7: Layer 3 Petals
The final layer creates the largest backdrop of petals to complete the dimensional look.
- Chain 2.
- Work 5 double crochets into the first chain-6 space.
- Chain 2, then slip stitch into the same space.
- Slip stitch into the next chain-6 space to transition.
- Chain 2, work 5 double crochets, chain 2, and slip stitch into that same space.
- Repeat this pattern for all 8 spaces.
Finishing the Flower
- After completing the final petal, slip stitch into the very first chain or post where you began the round to secure your work.
- Chain 1 to lock the stitch.
- Cut your yarn. If you intend to sew the flower onto an item like a hat or headband, leave a long tail. If you plan to glue it or weave it in, a shorter tail is sufficient.
- Pull the yarn through and knot the starting and ending tails together at the back to secure the flower structurally. Weave in any remaining ends.
Choosing the Right Hook and Yarn
The beauty of this design lies in its adaptability. While a medium-weight acrylic yarn with a 5 mm hook yields a sturdy, defined flower, switching to a delicate mohair or a lace-weight yarn with a smaller hook results in an entirely different, ethereal aesthetic. Always check the label of your chosen yarn to find the recommended hook size to ensure your stitches are neither too loose nor too tight.
Ideas for Embellishment and Decoration
Once your flower is complete, the center can serve as a canvas for extra details. You can elevate the project by sewing a vintage button, a shiny pearl, or gemstone decorations directly into the center circle. These flowers work wonderfully when attached to elastic bands for baby headbands, clipped onto hair barrettes, or stitched onto blankets and garments.
The below video contains all the steps you need.
Video Tutorial
For a visual demonstration of the stitching, placement, and post techniques used in this pattern, you can follow along with the full process here: